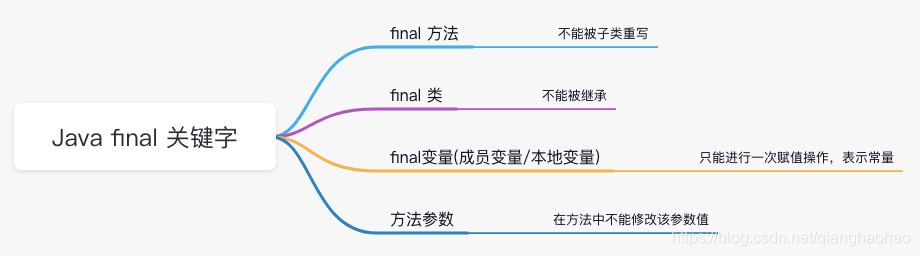
Jim

Talk is cheap. Show me the code.


  • 首页

  • 归档

  • 分类

  • 标签

  • 关于

  • 搜索

SpringBoot 使用 Redis 分布式锁解决并发问题

发表于 2021-07-24 | 分类于 Java

问题背景

现在的应用程序架构中,很多服务都是多副本运行,从而保证服务的稳定性。一个服务实例挂了,其他服务依旧可以接收请求。但是服务的多副本运行随之也会引来一些分布式问题,比如某个接口的处理逻辑是这样的:接收到请求后,先查询 DB 看是否有相关的数据,如果没有则插入数据,如果有则更新数据。在这种场景下如果相同的 N 个请求并发发到后端服务实例,就会出现重复插入数据的情况:
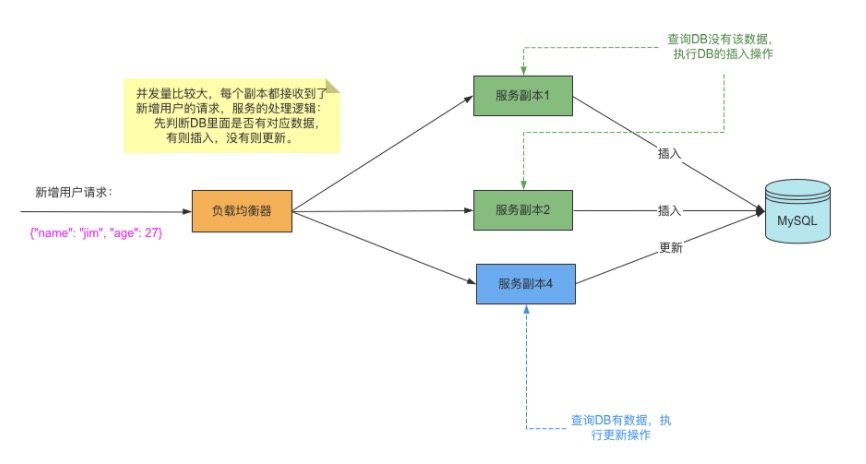
Alt text

解决方案

针对上面问题,一般的解决方案是使用分布式锁来解决。同一个进程内的话用本进程内的锁即可解决,但是服务多实例部署的话是分布式的,各自进程独立,这种情况下可以设置一个全局获取锁的地方,各个进程都可以通过某种方式获取这个全局锁,获得到锁后就可以执行相关业务逻辑代码,没有拿到锁则跳过不执行,这个全局锁就是我们所说的分布式锁。分布式锁一般有三种实现方式:1. 数据库乐观锁;2. 基于Redis的分布式锁;3. 基于ZooKeeper的分布式锁。

我们这里介绍如何基于 Redis 的分布式锁来解决分布式并发问题:Redis 充当获取全局锁的地方,每个实例在接收到请求的时候首先从 Redis 获取锁,获取到锁后执行业务逻辑代码,没争抢到锁则放弃执行。
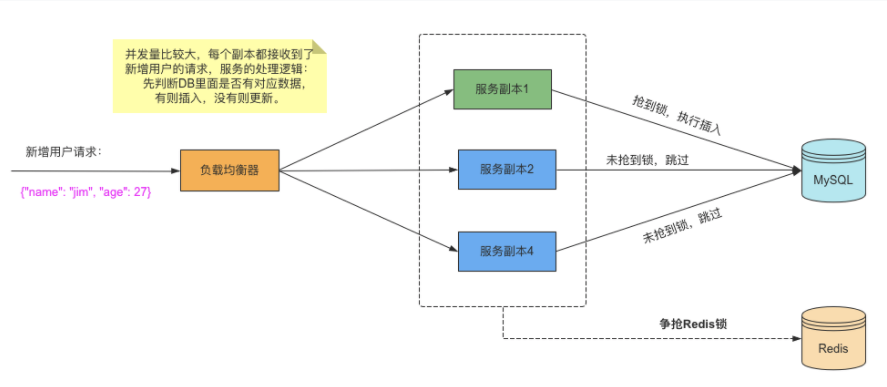
Alt text

主要实现原理:
Redis 锁主要利用 Redis 的 setnx 命令:

加锁命令:SETNX key value,当键不存在时,对键进行设置操作并返回成功,否则返回失败。KEY 是锁的唯一标识,一般按业务来决定命名。Value 一般用 UUID 标识,确保锁不被误解。

解锁命令:DEL key,通过删除键值对释放锁,以便其他线程可以通过 SETNX 命令来获取锁。

锁超时:EXPIRE key timeout, 设置 key 的超时时间,以保证即使锁没有被显式释放,锁也可以在一定时间后自动释放,避免资源被永远锁住。

可靠性:
为了确保分布式锁可用,我们至少要确保锁的实现同时满足以下四个条件:

  • 互斥性。在任意时刻,保证只有一台机器的一个线程可以持有锁;
  • 不会发生死锁。即使有一个客户端在持有锁的期间崩溃而没有主动解锁,也能保证后续其他客户端能加锁;
  • 具备非阻塞性。一旦获取不到锁就立刻返回加锁失败;
  • 加锁和解锁必须是同一个客户端,客户端自己不能把别人加的锁给解了;

SpringBoot 集成使用 Redis 分布式锁

写了一个 RedisLock 工具类,用于业务逻辑执行前加锁和业务逻辑执行完解锁操作。这里的加锁操作可能实现的不是很完善,有加锁和锁过期两个操作原子性问题,如果 SpringBoot 版本是2.x的话是可以用注释中的代码在加锁的时候同时设置锁过期时间,如果 SpringBoot 版本是2.x以下的话建议使用 Lua 脚本来确保操作的原子性,这里为了简单就先这样写:

1
2
3
4
5
6
7
8
9
10
11
12
13
14
15
16
17
18
19
20
21
22
23
24
25
26
27
28
29
30
31
32
33
34
35
36
37
38
39
40
41
42
43
44
45
46
47
48
49
50
51
52
53
54
55
56
57
58
59
60
61
import org.springframework.beans.factory.annotation.Autowired;
import org.springframework.data.redis.core.StringRedisTemplate;
import org.springframework.data.redis.core.script.DefaultRedisScript;
import org.springframework.stereotype.Component;

import java.util.ArrayList;
import java.util.List;
import java.util.concurrent.TimeUnit;

/**
* @description: Redis分布式锁实现工具类
* @author: qianghaohao
* @time: 2021/7/19
*/
@Component
public class RedisLock {
@Autowired
StringRedisTemplate redisTemplate;

/**
* 获取锁
*
* @param lockKey 锁
* @param identity 身份标识(保证锁不会被其他人释放)
* @param expireTime 锁的过期时间(单位:秒)
* @return
*/
public boolean lock(String lockKey, String identity, long expireTime) {
// 由于我们目前 springboot 版本比较低,1.5.9,因此还不支持下面这种写法
// return redisTemplate.opsForValue().setIfAbsent(lockKey, identity, expireTime, TimeUnit.SECONDS);
if (redisTemplate.opsForValue().setIfAbsent(lockKey, identity)) {
redisTemplate.expire(lockKey, expireTime, TimeUnit.SECONDS);
return true;
}
return false;
}

/**
* 释放锁
*
* @param lockKey 锁
* @param identity 身份标识(保证锁不会被其他人释放)
* @return
*/
public boolean releaseLock(String lockKey, String identity) {
String luaScript = "if " +
" redis.call('get', KEYS[1]) == ARGV[1] " +
"then " +
" return redis.call('del', KEYS[1]) " +
"else " +
" return 0 " +
"end";
DefaultRedisScript<Boolean> redisScript = new DefaultRedisScript<>();
redisScript.setResultType(Boolean.class);
redisScript.setScriptText(luaScript);
List<String> keys = new ArrayList<>();
keys.add(lockKey);
Object result = redisTemplate.execute(redisScript, keys, identity);
return (boolean) result;
}
}

使用示例

这里只贴出关键的使用代码,注意:锁的 key 根据自己的业务逻辑命名,能唯一标示同一个请求即可。value 这里设置为 UUID,为了确保释放锁的时候能正确释放(只释放自己加的锁)。

1
2
@Autowired
private RedisLock redisLock; // redis 分布式锁

1
2
3
4
5
6
7
8
9
10
11
12
13
14
15
16
17
18
 String redisLockKey = String.format("%s:docker-image:%s", REDIS_LOCK_PREFIX, imageVo.getImageRepository());
String redisLockValue = UUID.randomUUID().toString();
try {
if (!redisLock.lock(redisLockKey, redisLockValue, REDIS_LOCK_TIMEOUT)) {
logger.info("redisLockKey [" + redisLockKey + "] 已存在,不执行镜像插入和更新");
result.setMessage("新建镜像频繁,稍后重试,锁占用");
return result;
}
... // 执行业务逻辑
catch (Execpion e) {
... // 异常处理
} finally { // 释放锁
if (!redisLock.releaseLock(redisLockKey, redisLockValue)) {
logger.error("释放redis锁 [" + redisLockKey + "] 失败);
} else {
logger.error("释放redis锁 [" + redisLockKey + "] 成功");
}
}

参考文档

https://www.jianshu.com/p/6c2f85e2c586
https://xiaomi-info.github.io/2019/12/17/redis-distributed-lock/

SpirngBoot 整合使用 Redis

发表于 2021-07-17 | 分类于 Java

本文主要介绍如何在 springboot 项目中集成使用 Redis。springboot 将很多基础的工具组件都封装成了一个个的 starter,比如基础的 web 框架相关的 pring-boot-starter-web,操作数据库相关的 spring-boot-starter-data-jpa 等等。如果要操作 Redis,同理需要引入 redis 相关的 starter:spring-boot-starter-data-redis。下面介绍 springboot 集成使用 Redis 的详细过程。

1、引入 redis starter POM 依赖

1
2
3
4
<dependency>
<groupId>org.springframework.boot</groupId>
<artifactId>spring-boot-starter-data-redis</artifactId>
</dependency>

2、Redis 数据源配置

springboot 配置文件(application.properties)添加如下 redis 配置:

1
2
3
4
5
6
# Redis服务器地址
spring.redis.host=127.0.0.1
# Redis服务器连接端口
spring.redis.port=6379
# Redis服务器连接密码(默认为空)
spring.redis.password=

3、使用示例

写一个测试用例测试使用下,添加并查询 K-V:

1
2
3
4
5
6
7
8
9
10
11
12
@RunWith(SpringRunner.class)
@SpringBootTest
public class RedisUsageTest extends TestCase {
@Autowired
private StringRedisTemplate redisTemplate;

@Test
public void redisUsageTest() {
redisTemplate.opsForValue().set("name", "jim");
System.out.println(redisTemplate.opsForValue().get("name"));
}
}

登录 Redis 控制台可以看到数据已经写入了 Redis

1
2
3
127.0.0.1:6379> get name
"jim"
127.0.0.1:6379>

参考文档

https://cloud.tencent.com/developer/article/1457454
https://blog.csdn.net/tuzongxun/article/details/107794207

Java 解压 gzip 和 tar.gz 文件

发表于 2021-05-23 | 分类于 Java

在开发过程中有时候会需要解压 gzip 或者 tar.gz 文件,下面封装了一个工具类,可以解压 gzip 和 tar.gz 文件。

1
2
3
4
5
6
7
8
9
10
11
12
13
14
15
16
17
18
19
20
21
22
23
24
25
26
27
28
29
30
31
32
33
34
35
36
37
38
39
40
41
42
43
44
45
46
47
48
49
50
51
52
53
54
55
56
57
58
59
60
61
62
63
64
65
66
67
68
69
70
71
72
73
74
75
76
77
78
package com.example.demo.common.utils;
/**
* Created by qianghaohao on 2021/5/23
*/

import org.apache.commons.compress.archivers.tar.TarArchiveEntry;
import org.apache.commons.compress.archivers.tar.TarArchiveInputStream;
import org.apache.commons.compress.compressors.gzip.GzipCompressorInputStream;

import java.io.BufferedOutputStream;
import java.io.File;
import java.io.FileInputStream;
import java.io.FileOutputStream;
import java.io.IOException;
import java.util.zip.GZIPInputStream;

/**
* @description:
* @author: qianghaohao
* @time: 2021/5/23
*/
public class FileUtils {
private static final int BUFFER_SIZE = 1024;

/**
* 解压 gzip 文件
*
* @param input
* @param output
*
*/
public static void decompressGzip(File input, File output) throws IOException {
try (GZIPInputStream in = new GZIPInputStream(new FileInputStream(input))) {
try (FileOutputStream out = new FileOutputStream(output)) {
byte[] buffer = new byte[BUFFER_SIZE];
int len;
while((len = in.read(buffer)) != -1) {
out.write(buffer, 0, len);
}
}
}
}

/**
* 解压 tar.gz 文件到指定目录
*
* @param tarGzFile tar.gz 文件路径
* @param destDir 解压到 destDir 目录,如果没有则自动创建
*
*/
public static void extractTarGZ(File tarGzFile, String destDir) throws IOException {

GzipCompressorInputStream gzipIn = new GzipCompressorInputStream(new FileInputStream(tarGzFile));
try (TarArchiveInputStream tarIn = new TarArchiveInputStream(gzipIn)) {
TarArchiveEntry entry;

while ((entry = (TarArchiveEntry) tarIn.getNextEntry()) != null) {
if (entry.isDirectory()) {
File f = new File(destDir + "/" + entry.getName());
boolean created = f.mkdirs();
if (!created) {
System.out.printf("Unable to create directory '%s', during extraction of archive contents.\n",
f.getAbsolutePath());
}
} else {
int count;
byte [] data = new byte[BUFFER_SIZE];
FileOutputStream fos = new FileOutputStream(destDir + "/" + entry.getName(), false);
try (BufferedOutputStream dest = new BufferedOutputStream(fos, BUFFER_SIZE)) {
while ((count = tarIn.read(data, 0, BUFFER_SIZE)) != -1) {
dest.write(data, 0, count);
}
}
}
}
}
}
}

使用示例:

1
2
3
4
5
6
7
8
9
10
11
12
@Test
public void decompressGizpTest() throws IOException {
File input = new File("/xxx/output.gz");
File output = new File("/xxx/output");
FileUtils.decompressGzip(input, output);
}

@Test
public void decompressTarGizpTest() throws IOException {
File input = new File("/xxx/output.tar.gz");
FileUtils.extractTarGZ(input, "/tmp/");
}

Java 发送 HTTP 请求的两种常用方法

发表于 2021-05-16 | 分类于 Java

本文主要介绍在 Java 编程中发送 HTTP 请求的两种常用方法:

  • JDK 原生的 HttpURLConnection 发送 HTTP 请求
  • Apache HhttpClient 发送 HTTP 请求

两种方法都可以发送 HTTP 请求,第一种是 Java 原生的,因此使用起来相对麻烦一些,第二种是通过第三方的包来实现,这个包是 Apache 旗下的专门用来发送 HTTP 请求的 HttpClient 包,是对 Java 原生的 HttpURLConnection 扩展,因此功能也更加强大,使用起来也相对简单一些,目前这种方式发送 HTTP 请求应用比较广泛,因此主要学习这种方式。

Apache HttpClient 官方文档见这里:http://hc.apache.org/httpcomponents-client-5.1.x/

Talk is cheap. Show me the code. 下面看具体使用代码示例。

1、JDK 原生的 HttpURLConnection 发送 HTTP 请求 GET/POST

基于 JDK 原生的 HttpURLConnection 类,简单封装了下 HTTP GET 和 POST 请求方法,重在学习使用。

1
2
3
4
5
6
7
8
9
10
11
12
13
14
15
16
17
18
19
20
21
22
23
24
25
26
27
28
29
30
31
32
33
34
35
36
37
38
39
40
41
42
43
44
45
46
47
48
49
50
51
52
53
54
55
56
57
58
59
60
61
62
63
64
65
66
67
68
69
70
71
72
73
74
75
76
77
78
79
80
81
82
83
84
85
86
87
88
89
90
91
92
93
94
95
96
97
98
99
100
101
102
103
104
105
106
107
108
109
110
111
112
113
114
115
116
117
118
119
120
121
122
123
124
125
126
127
128
129
130
131
132
133
134
135
136
137
138
139
140
141
142
143
144
145
146
147
148
149
150
151
152
153
154
155
156
157
158
159
160
161
package com.example.demo.common.utils;
/**
* Created by qianghaohao on 2021/5/16
*/

import java.io.BufferedReader;
import java.io.IOException;
import java.io.InputStream;
import java.io.InputStreamReader;
import java.io.OutputStream;
import java.net.HttpURLConnection;
import java.net.MalformedURLException;
import java.net.URL;

/**
* @description: 使用 java 原生 HttpURLConnection 类发送 http 请求
* @author: qianghaohao
* @time: 2021/5/16
*/
public class HttpURLConnectionUtils {
public static String doGet(String httpUrl) {
HttpURLConnection connection = null;
InputStream inputStream = null;
BufferedReader bufferedReader = null;
String result = null;
try {
// 创建远程url连接对象
URL url = new URL(httpUrl);

// 通过远程url连接对象打开一个连接,强转成httpURLConnection类
connection = (HttpURLConnection) url.openConnection();

// 设置连接方式:get
connection.setRequestMethod("GET");

// 设置连接主机服务器的超时时间:15000毫秒
connection.setConnectTimeout(15000);

// 设置读取远程返回的数据时间:60000毫秒
connection.setReadTimeout(60000);

// 通过connection连接,获取输入流
if (connection.getResponseCode() == 200) {
inputStream = connection.getInputStream();
// 封装输入流is,并指定字符集
bufferedReader = new BufferedReader(new InputStreamReader(inputStream, "UTF-8"));
// 存放数据
StringBuilder sb = new StringBuilder();
String temp;
while ((temp = bufferedReader.readLine()) != null) {
sb.append(temp);
sb.append(System.lineSeparator()); // 这里需要追加换行符,默认读取的流没有换行符,需要加上才能符合预期
}
result = sb.toString();
}
} catch (IOException e) {
e.printStackTrace();
} finally {
// 关闭资源
if (null != bufferedReader) {
try {
bufferedReader.close();
} catch (IOException e) {
e.printStackTrace();
}
}
if (null != inputStream) {
try {
inputStream.close();
} catch (IOException e) {
e.printStackTrace();
}
}

if (null != connection) {
connection.disconnect();// 关闭远程连接
}
}
return result;
}


public static String doPost(String httpUrl, String param) {
HttpURLConnection connection = null;
InputStream is = null;
OutputStream os = null;
BufferedReader br = null;
String result = null;
try {
URL url = new URL(httpUrl);
// 通过远程url连接对象打开连接
connection = (HttpURLConnection) url.openConnection();

// 设置连接请求方式
connection.setRequestMethod("POST");

// 设置连接主机服务器超时时间:15000毫秒
connection.setConnectTimeout(15000);

// 设置读取主机服务器返回数据超时时间:60000毫秒
connection.setReadTimeout(60000);

// 默认值为:false,当向远程服务器传送数据/写数据时,需要设置为true
connection.setDoOutput(true);

// 设置传入参数的格式:请求参数应该是 name1=value1&name2=value2 的形式。
connection.setRequestProperty("Content-Type", "application/x-www-form-urlencoded");

// 通过连接对象获取一个输出流
os = connection.getOutputStream();

// 通过输出流对象将参数写出去/传输出去,它是通过字节数组写出的
os.write(param.getBytes());

// 通过连接对象获取一个输入流,向远程读取
if (connection.getResponseCode() == 200) {
is = connection.getInputStream();
// 对输入流对象进行包装:charset根据工作项目组的要求来设置
br = new BufferedReader(new InputStreamReader(is, "UTF-8"));
StringBuilder sb = new StringBuilder();
String temp;
// 循环遍历一行一行读取数据
while ((temp = br.readLine()) != null) {
sb.append(temp);
sb.append(System.lineSeparator());
}
result = sb.toString();
}
} catch (IOException e) {
e.printStackTrace();
} finally {
// 关闭资源
if (null != br) {
try {
br.close();
} catch (IOException e) {
e.printStackTrace();
}
}
if (null != os) {
try {
os.close();
} catch (IOException e) {
e.printStackTrace();
}
}
if (null != is) {
try {
is.close();
} catch (IOException e) {
e.printStackTrace();
}
}
if (null != connection) {
// 断开与远程地址url的连接
connection.disconnect();
}
}
return result;
}
}

2、Apache HhttpClient 发送 HTTP 请求 GET/POST

基于 Apache HhttpClient,简单封装了下 HTTP GET 和 POST 请求方法,重在学习使用。

1
2
3
4
5
6
7
8
9
10
11
12
13
14
15
16
17
18
19
20
21
22
23
24
25
26
27
28
29
30
31
32
33
34
35
36
37
38
39
40
41
42
43
44
45
46
47
48
49
50
51
52
53
54
55
56
57
58
59
60
61
62
63
64
65
66
67
68
69
70
71
72
73
74
75
76
77
78
79
80
81
82
83
84
85
86
87
88
89
90
91
92
93
94
95
96
97
98
99
100
101
102
103
104
105
106
107
108
109
110
111
112
113
114
115
116
117
118
119
120
121
122
123
124
125
package com.example.demo.common.utils;
/**
* Created by qianghaohao on 2021/5/16
*/

import org.apache.http.HttpEntity;
import org.apache.http.NameValuePair;
import org.apache.http.client.entity.UrlEncodedFormEntity;
import org.apache.http.client.methods.CloseableHttpResponse;
import org.apache.http.client.methods.HttpGet;
import org.apache.http.client.methods.HttpPost;
import org.apache.http.impl.client.CloseableHttpClient;
import org.apache.http.impl.client.HttpClients;
import org.apache.http.message.BasicNameValuePair;
import org.apache.http.util.EntityUtils;

import java.io.IOException;
import java.io.UnsupportedEncodingException;
import java.util.ArrayList;
import java.util.List;
import java.util.Map;
import java.util.Set;

/**
* @description: 使用 Apache HttpClient 发送 http 请求
* @author: qianghaohao
* @time: 2021/5/16
*/
public class HttpClientUtils {
public static String doGet(String url) {
String content = null;
// 创建 HttpClient 对象
CloseableHttpClient httpclient = HttpClients.createDefault();

// 创建 Http GET 请求
HttpGet httpGet = new HttpGet(url);

CloseableHttpResponse response = null;
try {
// 执行请求
response = httpclient.execute(httpGet);
// 判断返回状态是否为200
if (response.getStatusLine().getStatusCode() == 200) {
//响应体内容
content = EntityUtils.toString(response.getEntity(), "UTF-8");
}
} catch (IOException e) {
e.printStackTrace();
} finally {
if (response != null) {
try {
response.close();
} catch (IOException e) {
e.printStackTrace();
}
}
try {
httpclient.close();
} catch (IOException e) {
e.printStackTrace();
}
}

return content;
}

public static String doPost(String url, Map<String, Object> paramMap) {
CloseableHttpClient httpClient = null;
CloseableHttpResponse httpResponse = null;
String result = null;
// 创建httpClient实例
httpClient = HttpClients.createDefault();

// 创建httpPost远程连接实例
HttpPost httpPost = new HttpPost(url);

// 设置请求头
httpPost.addHeader("Content-Type", "application/x-www-form-urlencoded");

// 封装post请求参数
if (null != paramMap && paramMap.size() > 0) {
List<NameValuePair> nvps = new ArrayList<NameValuePair>();
// 通过map集成entrySet方法获取entity
Set<Map.Entry<String, Object>> entrySet = paramMap.entrySet();
// 循环遍历,获取迭代器
for (Map.Entry<String, Object> mapEntry : entrySet) {
nvps.add(new BasicNameValuePair(mapEntry.getKey(), mapEntry.getValue().toString()));
}
// 为httpPost设置封装好的请求参数
try {
httpPost.setEntity(new UrlEncodedFormEntity(nvps, "UTF-8"));
} catch (UnsupportedEncodingException e) {
e.printStackTrace();
}
}

try {
// httpClient对象执行post请求,并返回响应参数对象
httpResponse = httpClient.execute(httpPost);
// 从响应对象中获取响应内容
HttpEntity entity = httpResponse.getEntity();
result = EntityUtils.toString(entity);
} catch (IOException e) {
e.printStackTrace();
} finally {
// 关闭资源
if (null != httpResponse) {
try {
httpResponse.close();
} catch (IOException e) {
e.printStackTrace();
}
}
if (null != httpClient) {
try {
httpClient.close();
} catch (IOException e) {
e.printStackTrace();
}
}
}

return result;
}
}

3、上面封装类使用示例

1
2
3
4
5
6
7
8
9
10
11
12
13
14
15
16
17
18
19
20
21
22
23
24
25
26
27
28
29
@Test
public void httpDoGetTest() {
// Java 原生 HttpURLConnection 发送 HTTP 请求测试
String url = "https://httpbin.org/get";
String result = HttpURLConnectionUtils.doGet(url);
System.out.println(result);

// Apache HttpClient 发送 http 请求测试
System.out.println("==============");
result = HttpClientUtils.doGet(url);
System.out.println(result);
}

@Test
public void httpDoPostTest() {
// Java 原生 HttpURLConnection 发送 HTTP 请求测试
String url = "https://httpbin.org/post";
String urlParameters = "name=Jack&occupation=programmer";
String result = HttpURLConnectionUtils.doPost(url, urlParameters);
System.out.println(result);

// Apache HttpClient 发送 http 请求测试
System.out.println("==============");
Map<String, Object> params = new HashMap<>();
params.put("name", "Jack");
params.put("occupation", "programmer");
result = HttpClientUtils.doPost(url, params);
System.out.println(result);
}

Mac 下多版本 JDK 安装及切换

发表于 2021-04-10 | 分类于 Java

背景

由于公司项目基于 JDK 1.8,我本地默认安装的是 JDK 10,这样在 idea 中通过 maven 编译的时候各种报错,有点不兼容。为了解决这个问题最好的办法就是再安装一个 1.8 的 JDK 版本了,和公司项目代码版本兼容。本文主要介绍 Mac 下如何安装 JDK 并且多版本如何切换。

Mac 下 JDK 安装配置

Mac 下安装 JDK 比较简单,只需要访问 Oracle 官网,找到对应环境和版本的 JDK 下载安装即可,下载 mac 下的 dmg 安装文件,一路点击下一步即可。
JDK 下载页面见这里: https://www.oracle.com/cn/java/technologies/javase-downloads.html

mac 下安装 jdk 1.8 的话只需要下载这个安装包即可:jdk-8u281-macosx-x64.dmg

同时安装其他版本,只需要下载其他版本的 dmg 安装包安装即可。

Mac 下多版本 JDK 切换

1、使用如下命令查看本地安装了哪些 JDK 版本及对应的安装路径:

1
2
3
4
5
6
haohao@haohaodeMacBook-Pro  ~  /usr/libexec/java_home -V                                                                                                                                                                    ✔  11:03:12
Matching Java Virtual Machines (2):
10.0.2, x86_64: "Java SE 10.0.2" /Library/Java/JavaVirtualMachines/jdk-10.0.2.jdk/Contents/Home
1.8.0_281, x86_64: "Java SE 8" /Library/Java/JavaVirtualMachines/jdk1.8.0_281.jdk/Contents/Home

/Library/Java/JavaVirtualMachines/jdk-10.0.2.jdk/Contents/Home

可以看出当前系统有两个 JDK 版本和对应的安装路径。

2、切换到对应的 JDK 版本

设置 JAVA_HOME 环境变量为 JDK 安装路径,vim ~/.zshrc

1
export JAVA_HOME=/Library/Java/JavaVirtualMachines/jdk1.8.0_281.jdk/Contents/Home

source 一下让配置生效: source ~/.zshrc

3、检查版本是否切换成功

1
2
3
4
haohao@haohaodeMacBook-Pro  ~  java -version                                                                                                                                                                                ✔  11:11:27
java version "1.8.0_281"
Java(TM) SE Runtime Environment (build 1.8.0_281-b09)
Java HotSpot(TM) 64-Bit Server VM (build 25.281-b09, mixed mode)

Java JSch 远程执行 Shell 命令

发表于 2021-04-03 | 分类于 Java

背景

项目需求,需要远程 ssh 登录到某个节点执行 shell 命令来完成任务。对于这种需求,如果不用 java 程序,直接 linux 的 ssh 命令就可以完成,但是在编码到程序中时需要相关的程序包来完成,本文主要介绍在 java 中如何使用 JSch 包实现 ssh 远程连接并执行命令。

JSch 简介

JSch 是Java Secure Channel的缩写。JSch是一个SSH2的纯Java实现。它允许你连接到一个SSH服务器,并且可以使用端口转发,X11转发,文件传输等,当然你也可以集成它的功能到你自己的应用程序。框架jsch很老的框架,更新到2016年,现在也不更新了。

JSch 使用 shell 执行命令,有两种方法

  • ChannelExec: 一次执行一条命令,一般我们用这个就够了。
  • ChannelShell: 可执行多条命令,平时开发用的不多,根据需要来吧;
    1
    2
    ChannelExec channelExec = (ChannelExec) session.openChannel("exec");//只能执行一条指令(也可执行符合指令)
    ChannelShell channelShell = (ChannelShell) session.openChannel("shell");//可执行多条指令 不过需要输入输出流

1. ChannelExec

  • 每个命令之间用 ; 隔开。说明:各命令的执行给果,不会影响其它命令的执行。换句话说,各个命令都会执行,但不保证每个命令都执行成功。
  • 每个命令之间用 && 隔开。说明:若前面的命令执行成功,才会去执行后面的命令。这样可以保证所有的命令执行完毕后,执行过程都是成功的。
  • 每个命令之间用 || 隔开。说明:|| 是或的意思,只有前面的命令执行失败后才去执行下一条命令,直到执行成功一条命令为止。

2. ChannelShell

对于ChannelShell,以输入流的形式,可执行多条指令,这就像在本地计算机上使用交互式shell(它通常用于:交互式使用)。如要要想停止,有两种方式:

  • 发送一个exit命令,告诉程序本次交互结束;
  • 使用字节流中的available方法,来获取数据的总大小,然后循环去读。

使用示例

1. 引入 pom 依赖

1
2
3
4
5
<dependency>
<groupId>com.jcraft</groupId>
<artifactId>jsch</artifactId>
<version>0.1.53</version>
</dependency>

2. jsch 使用示例

在此封装了一个 Shell 工具类,用来执行 shell 命令,具体使用细节在代码注释中有说明,可以直接拷贝并使用,代码如下:

1
2
3
4
5
6
7
8
9
10
11
12
13
14
15
16
17
18
19
20
21
22
23
24
25
26
27
28
29
30
31
32
33
34
35
36
37
38
39
40
41
42
43
44
45
46
47
48
49
50
51
52
53
54
55
56
57
58
59
60
61
62
63
64
65
66
67
68
69
70
71
72
73
74
75
76
77
78
79
80
81
82
83
84
85
86
87
88
89
90
91
92
93
94
95
96
97
98
99
100
101
102
103
104
105
106
107
108
109
110
package org.example.shell;
/**
* Created by qianghaohao on 2021/3/28
*/


import com.jcraft.jsch.ChannelExec;
import com.jcraft.jsch.JSch;
import com.jcraft.jsch.Session;

import java.io.BufferedReader;
import java.io.IOException;
import java.io.InputStreamReader;

/**
* @description:
* @author: qianghaohao
* @time: 2021/3/28
*/
public class Shell {
private String host;
private String username;
private String password;
private int port = 22;
private int timeout = 60 * 60 * 1000;

public Shell(String host, String username, String password, int port, int timeout) {
this.host = host;
this.username = username;
this.password = password;
this.port = port;
this.timeout = timeout;
}

public Shell(String host, String username, String password) {
this.host = host;
this.username = username;
this.password = password;
}

public String execCommand(String cmd) {
JSch jSch = new JSch();
Session session = null;
ChannelExec channelExec = null;
BufferedReader inputStreamReader = null;
BufferedReader errInputStreamReader = null;
StringBuilder runLog = new StringBuilder("");
StringBuilder errLog = new StringBuilder("");
try {
// 1. 获取 ssh session
session = jSch.getSession(username, host, port);
session.setPassword(password);
session.setTimeout(timeout);
session.setConfig("StrictHostKeyChecking", "no");
session.connect(); // 获取到 ssh session

// 2. 通过 exec 方式执行 shell 命令
channelExec = (ChannelExec) session.openChannel("exec");
channelExec.setCommand(cmd);
channelExec.connect(); // 执行命令

// 3. 获取标准输入流
inputStreamReader = new BufferedReader(new InputStreamReader(channelExec.getInputStream()));
// 4. 获取标准错误输入流
errInputStreamReader = new BufferedReader(new InputStreamReader(channelExec.getErrStream()));

// 5. 记录命令执行 log
String line = null;
while ((line = inputStreamReader.readLine()) != null) {
runLog.append(line).append("\n");
}

// 6. 记录命令执行错误 log
String errLine = null;
while ((errLine = errInputStreamReader.readLine()) != null) {
errLog.append(errLine).append("\n");
}

// 7. 输出 shell 命令执行日志
System.out.println("exitStatus=" + channelExec.getExitStatus() + ", openChannel.isClosed="
+ channelExec.isClosed());
System.out.println("命令执行完成,执行日志如下:");
System.out.println(runLog.toString());
System.out.println("命令执行完成,执行错误日志如下:");
System.out.println(errLog.toString());
} catch (Exception e) {
e.printStackTrace();
} finally {
try {
if (inputStreamReader != null) {
inputStreamReader.close();
}
if (errInputStreamReader != null) {
errInputStreamReader.close();
}

if (channelExec != null) {
channelExec.disconnect();
}
if (session != null) {
session.disconnect();
}
} catch (IOException e) {
e.printStackTrace();
}
}

return runLog.toString();
}
}

上述工具类使用:

1
2
3
4
5
6
7
8
9
10
11
12
13
14
15
16
package org.example;

import org.example.shell.Shell;

/**
* Hello world!
*
*/
public class App {
public static void main( String[] args ) {
String cmd = "ls -1";
Shell shell = new Shell("192.168.10.10", "ubuntu", "11111");
String execLog = shell.execCommand(cmd);
System.out.println(execLog);
}
}

需要注意的点

如果需要后台执行某个命令,不能直接 <命令> + & 的方式执行,这样在 JSch 中不生效,需要写成这样的格式:<命令> > /dev/null 2>&1 &。比如要后台执行 sleep 60,需要写成 sleep 60 > /dev/null 2>&1

具体 issue 见这里:https://stackoverflow.com/questions/37833683/running-programs-using-jsch-in-the-background

参考文档

https://www.cnblogs.com/slankka/p/11988477.html

https://blog.csdn.net/sinat_24928447/article/details/83022818

Java 中 final 关键字详解

发表于 2021-04-03 | 分类于 Java

在 Java 中,final 关键字可以修饰的东西比较多,很容易混淆,在这里记录一下。主要从功能上说明一下,不做过多的代码演示。

final 关键字用途

1. final 变量

凡是对成员变量或者本地变量(在方法中的或者代码块中的变量称为本地变量)声明为final的都叫作final变量。final变量经常和static关键字一起使用,作为常量。用final关键字修饰的变量,只能进行一次赋值操作,并且在生存期内不可以改变它的值。

2. final方法参数

如果 final 关键字修饰方法参数时,方法中是不能改变该参数的,举例如下:

1
2
3
4
public void testFunc(final Integer i) {
i = 20; // 报错: Cannot assign a value to final variable 'i'
System.out.println(i);
}

3. final 方法

final也可以声明方法。方法前面加上final关键字,代表这个方法不可以被子类的方法重写。如果你认为一个方法的功能已经足够完整了,子类中不需要改变的话,你可以声明此方法为final。final方法比非final方法要快,因为在编译的时候已经静态绑定了,不需要在运行时再动态绑定。

4. final 类

使用final来修饰的类叫作final类。final类通常功能是完整的,它们不能被继承。Java 中有许多类是final的,譬如String, Interger以及其他包装类。

5. final 关键字好处

  • final关键字提高了性能。JVM和Java应用都会缓存final变量。
  • final变量可以安全的在多线程环境下进行共享,而不需要额外的同步开销。
  • 使用final关键字,JVM会对方法、变量及类进行优化。

final 和 static

两者得分开解释,不能混为一谈,这样更容易理解,static 作用于成员变量用来表示只保存一份副本,是类变量而已,而final的作用是用来保证变量不可变。两者用在一起表示类的不可以修改值的类变量。

1
2
3
4
public final class Employee {
public static final String SERVER = "example.com:9090";
...
}

总结

在这里插入图片描述

参考文档

https://www.jb51.net/article/157603.htm

GO 语言程序设计读书笔记-接口值

发表于 2020-09-06 | 分类于 Go

从概念上来讲,一个接口类型的值(简称接口值)其实有两个部分:一个具体类型和该类型的一个值。二者称为接口的动态类型和动态值。比如下面声明一个接口变量 w 并赋值,那么 w 接口值可以用如下图表示:

Alt text

接口的零值

接口的零值就是把它的动态类型和动态值都设为 nil,如下图所示:
var w io.Writer // 接口的零值

Alt text

在这种情况下就是一个 nil 接口值,可以用 w == nil 或者 w != nil 来检测一个接口值是否时 nil。调用一个 nil 接口的任何方法都会导致崩溃:
w.Write([]byte("hello")) // panic:对空指针引用值

接口值的比较

接口值可以用 == 和 != 来做比较。如果两个接口值都是 nil 或者二者的动态类型完全一致且二者动态值相等(使用动态类型的==操作符来比较),那么两个接口值相等。因为接口值是可以比较的,所以它们可以作为 map 的键,也可以作为 switch 语句的操作数。

注意:在比较两个接口值时,如果两个接口值的动态类型一致,但对应的动态值是不可以比较的(比如 slice),那么这个比较会导致代码 panic:

1
2
3
4
5
6
7
8
9
10
package main

import (
"fmt"
)

func main() {
var x interface{} = []int{1, 2, 3}
fmt.Println(x == x)
}

panic 信息:

1
2
3
4
5
panic: runtime error: comparing uncomparable type []int

goroutine 1 [running]:
main.main()
/Users/qianghaohao/go/src/examplecode/main.go:9 +0x82

获取接口值的动态类型

使用 fmt 包的 %T 可以打印某个接口值的动态类型,有助于问题调试:

1
2
3
4
5
6
7
func main() {
var w io.Writer
fmt.Printf("%T\n", w) // <nil>

w = os.Stdout
fmt.Printf("%T\n", w) // os.File
}

输出:

1
2
<nil>
*os.File

nil 接口值和动态值为 nil 接口值的区别

nil 接口值:接口值的动态类型和动态值都为 nil。

1
var w io.Writer

Alt text

动态值为 nil 的接口:接口值的动态类型有具体类型,动态值为 nil。

1
2
var buf *bytes.Buffer
var w io.Writer = buf

Alt text

示例代码分析:

1
2
3
4
5
6
7
8
9
10
11
12
13
14
15
const debug = false

func main() {
var buf *bytes.Buffer
if debug {
buf = new(bytes.Buffer)
}
f(buf)
}

func f(out io.Writer) {
if out != nil {
out.Write([]byte("done!\n"))
}
}

当 debug 为 true 时,buf 为执行 bytes.Buffer 对象的一个指针,当调用函数 f 时,将 buf 赋给 out,此时 out 的动态值不是 nil,而是指向 byte.Buffer 对象的指针。out 的动态类型是 *byte.Buffer。随后调用 out.Write 函数,代码正常运行,不会引发 panic。

当 debug 为 false 时,调用函数 f 时,将 buf 赋值给 out,此时 out 的动态值虽然时 nil,但其动态类型不是 nil,所以 out != nil 表达式为 true,随后调用 out.Write 函数,但是 Write 函数的接收者为 nil,所以在底层拷贝 buffer 时会导致 panic(空指针引用),具体可以看看 Write 函数的底层实现就知道了。

使用 kind 1 分钟启动一个本地 k8s 开发集群

发表于 2020-08-15 | 分类于 Kubernetes

kind 简介

Github 地址:https://github.com/kubernetes-sigs/kind
kind 是一个快速启动 kubernetes 集群的工具,适合本地 k8s 开发环境搭建,能在 1 分钟之内就启动一个非常轻量级的 k8s 集群。之所以如此之快,得益于其基于其把整个 k8s 集群用到的组件都封装在了 Docker 容器里,构建一个 k8s 集群就是启动一个 Docker 容器,如此简单,正如下面图片描述一样:

Alt text

说说我为什么使用 kind 吧:
我之前本地 k8s 开发环境是基于 vagrant + virtualbox 来搭建,但是和 kind 比起来太重量级了,主要有如下痛点:

  • 资源消耗严重:vagrant + virtualbox + kubernetes 这一套其实本质上还是 k8s 运行在 virtualbox 虚拟机上,这个资源消耗可想而知,我的电脑配置低,经常由于资源消耗太多导致电脑发热、风扇狂转、死机。。。
  • 使用复杂:vagrant + virtualbox + kubernetes 虽然比直接二进制搭建简化了不少,但是还是有一定的技术门槛的,需要对 vagrant 有一定的了解,而且编写 vagrant 需要有一定的经验才能把集群配置好;

kind 使用

kind 的使用非常简单,其实就是一个命令行工具,通过这个工具创建、删除 k8s 集群,下面简单说下使用。

1.准备工作

  • Kind 的主要功能目前需要有 Docker 环境的支持,可参考 Docker 官方文档进行安装;
  • 安装操作 k8s 的 kubectl 命令行,安装方法可参考官方文档;

2.安装
到 github release 页下载对应操作系统的二进制文件到本地,并放到 PATH 环境变量:
https://github.com/kubernetes-sigs/kind/releases

3.创建集群

1
kind create cluster

完成后就可以直接 kubectl 操作集群了,kubeconfig 已经自动生效了,在 ~/.kube/config 路径。

1
2
3
$ kubectl get node
NAME STATUS ROLES AGE VERSION
kind-control-plane Ready master 53m v1.18.2

4.获取集群 kubeconfig 文件

1
kind get kubeconfig

5.销毁集群

1
kind delete cluster

执行 kind --help 获取帮助和其他支持的命令参数。

kind 配置

我们可以对要创建的集群进行一些定制化配置,kind 支持的配置见这里:https://kind.sigs.k8s.io/docs/user/configuration/
配置方法:
参照文档,编写配置 kind 配置文件 config.yaml,然后在 kind 创建集群的时候指定配置文件:

1
kind create cluster --config=/foo/bar/config.yaml

举例:
默认 kind 创建出来的集群 apiserver 监听的地址是:127.0.0.1:[随机端口],我要改成默认监听的地址是:0.0.0.0:6443,编写如下 config.yaml

1
2
3
4
5
6
7
8
9
10
kind: Cluster
apiVersion: kind.x-k8s.io/v1alpha4
networking:
# WARNING: It is _strongly_ recommended that you keep this the default
# (127.0.0.1) for security reasons. However it is possible to change this.
apiServerAddress: "0.0.0.0"
# By default the API server listens on a random open port.
# You may choose a specific port but probably don't need to in most cases.
# Using a random port makes it easier to spin up multiple clusters.
apiServerPort: 6443

创建集群时指定上面配置文件:

1
kind create cluster --config=config.yaml

总结

总而言之,kind 是一个非常轻量级的工具,能以最轻量的方式构建 k8s 集群,其设计理念是是一个 k8s 就是一个 Docker 容器,构建复杂的 k8s 集群变成了启动一个 Docker 容器,如此简单。

我对 kind 的评价是:快!快!快! 轻量!轻量!轻量! 效率!效率!效率!

Golang 项目配置文件读取之 viper 实践

发表于 2020-07-11 | 分类于 Go

在我们做一个工程化项目的时候,经常涉及到配置文件的读取,viper 包很好地满足这一需求,而且在 Golang 生态中是流行度最高的。导入方式:

1
import "github.com/spf13/viper"

这里分享下我对 viper 包的使用关键实践:

首先,在代码工程中单独定义一个包(我一般起名为 config 或者 configloader),这个包专门用来读取加载配置文件,并做相关校验,包里面我定义 3 个函数和 1 个全局变量:

  • var viperConfig *viper.Viper: 全局配置变量;
  • func Init(configDir string) error: 初始化加载配置文件;
  • func GetConfig() *viper.Viper: 获取配置文件,供其他包调用,拿到配置文件实例;
  • func validateConfig(v *viper.Viper) error: 校验配置文件;

接下来在工程入口处引用上面这个配置包的 Init 函数做配置文件的初始化和加载,加载的结果就是实例化一个 viper.Viper 全局变量,在其他包中用的时候调用这个配置包的 func GetConfig() viper.Vipe 函数即可拿到这个全局变量,即配置文件内容。

示例代码(代码仅供参考,截取字自前做的爬虫程序部分代码):

1
2
3
4
5
6
7
8
9
10
11
12
13
14
15
16
17
18
19
20
21
22
23
24
25
26
27
28
29
30
31
32
33
34
35
36
37
38
39
40
41
42
43
44
45
46
47
48
49
50
51
52
53
54
55
56
57
58
59
60
61
62
63
64
65
66
67
68
69
70
71
72
73
74
75
76
package configloader

import (
"fmt"

"github.com/spf13/viper"

"example.com/pkg/util/fs"
)

// viperConfig 全局配置变量
var viperConfig *viper.Viper

// 初始化配置文件相关设置,在 main 包中调用进行初始化加载
func Init(configDir string) error {
if configDir == "" {
return fmt.Errorf("config directory is empty")
}
if !fs.PathExists(configDir) {
return fmt.Errorf("no such config directory: %s", configDir)
}

viper.SetConfigName("spider") // name of config file (without extension)
viper.AddConfigPath(configDir) // path to look for the config file in
err := viper.ReadInConfig() // Find and read the config file
if err != nil { // Handle errors reading the config file
return fmt.Errorf("Fatal error config file: %s \n", err)
}

viperConfig = viper.GetViper()
if err = validateConfig(viperConfig); err != nil {
return fmt.Errorf("invalid configuration, error msg: %s", err)
}
return nil
}

// GetConfig 获取全局配置
func GetConfig() *viper.Viper {
return viperConfig
}

func validateConfig(v *viper.Viper) error {
var (
urlListFile = v.GetString("urlListFile")
outputDirectory = v.GetString("outputDirectory")
maxDepth = v.GetInt("maxDepth")
crawlInterval = v.GetInt("crawlInterval")
crawlTimeout = v.GetInt("crawlTimeout")
targetUrl = v.GetString("targetUrl")
threadCount = v.GetInt("threadCount")
)

if urlListFile == "" {
return fmt.Errorf("invalid targetUrl: %s, please check configuration", urlListFile)
}
if outputDirectory == "" {
return fmt.Errorf("invalid targetUrl: %s, please check configuration", outputDirectory)
}
if maxDepth <= 0 {
return fmt.Errorf("invalid maxDepth: %d, please check configuration", maxDepth)
}
if crawlInterval <= 0 {
return fmt.Errorf("invalid crawlInterval: %d, please check configuration", crawlInterval)
}
if crawlTimeout <= 0 {
return fmt.Errorf("invalid crawlTimeout: %d, please check configuration", crawlTimeout)
}
if targetUrl == "" {
return fmt.Errorf("invalid targetUrl: %s, please check configuration", targetUrl)
}
if threadCount <= 0 {
return fmt.Errorf("invalid threadCount: %d, please check configuration", threadCount)
}

return nil
}

12…14

haohao

Talk is cheap. Show me the code.

134 日志
35 分类
43 标签
GitHub CSDN 开源中国 E-Mail
© 2017 — 2021 haohao
由 Hexo 强力驱动
|
主题 — NexT.Mist v5.1.3
访问人数 总访问量 次