在这里演示下如何通过 Go 读写文件,Go 读写文件有很 IO 多函数可以使用,在这里使用 os 包的 OpenFile 和 Open 函数打开文件,然后用 bufio 包带缓冲的读写器读写文件。查看 OpenFile 源码,其实 Open 函数底层还是调用了 OpenFile。1
2
3
4
5
6
7
8
9
10
11
12
13
14
15
16
17
18
19
20
21
22
23
24
25
26
27
28
29
30
31
32
33
34
35
36
37
38
39package main
import (
"bufio"
"fmt"
"io"
"os"
)
func main() {
// 写文件
outputFile, outputError := os.OpenFile("file.txt", os.O_WRONLY|os.O_CREATE|os.O_APPEND, 0666)
if outputError != nil {
fmt.Println(outputError)
return
}
defer outputFile.Close()
outputWriter := bufio.NewWriter(outputFile)
for i := 0; i < 10; i++ {
outputWriter.WriteString("hello, world\n")
}
// 一定得记得将缓冲区内容刷新到磁盘文件
outputWriter.Flush()
// 读文件
inputFile, inputError := os.Open("file.txt")
if inputError != nil {
fmt.Println(inputError)
return
}
defer inputFile.Close()
inputReader := bufio.NewReader(inputFile)
for {
inputString, readerError := inputReader.ReadString('\n')
fmt.Printf(inputString)
if readerError == io.EOF {
return
}
}
}
自动化测试报表统一平台 ReportPortal 集成 TestNG
本文主要介绍 ReportPortal 如何集成 TestNG 测试框架,用到的工具链有:ReportPortal + TestNG + log4j。ReportPortal 集成 TestNG 的主要原理是通过给 TestNG 配置 ReportPortal 的 listener,在测试开始时该监听器将测试信息实时上报给 ReportPortal 平台。另外我们通过给 log4j 配置 ReportPortal appender,将测试过程中代码日志也上报到 ReportPortal 平台。然后 ReportPortal 将收到的数据进行整合、分析,形成平台数据统一展示。
ReportPortal 简介
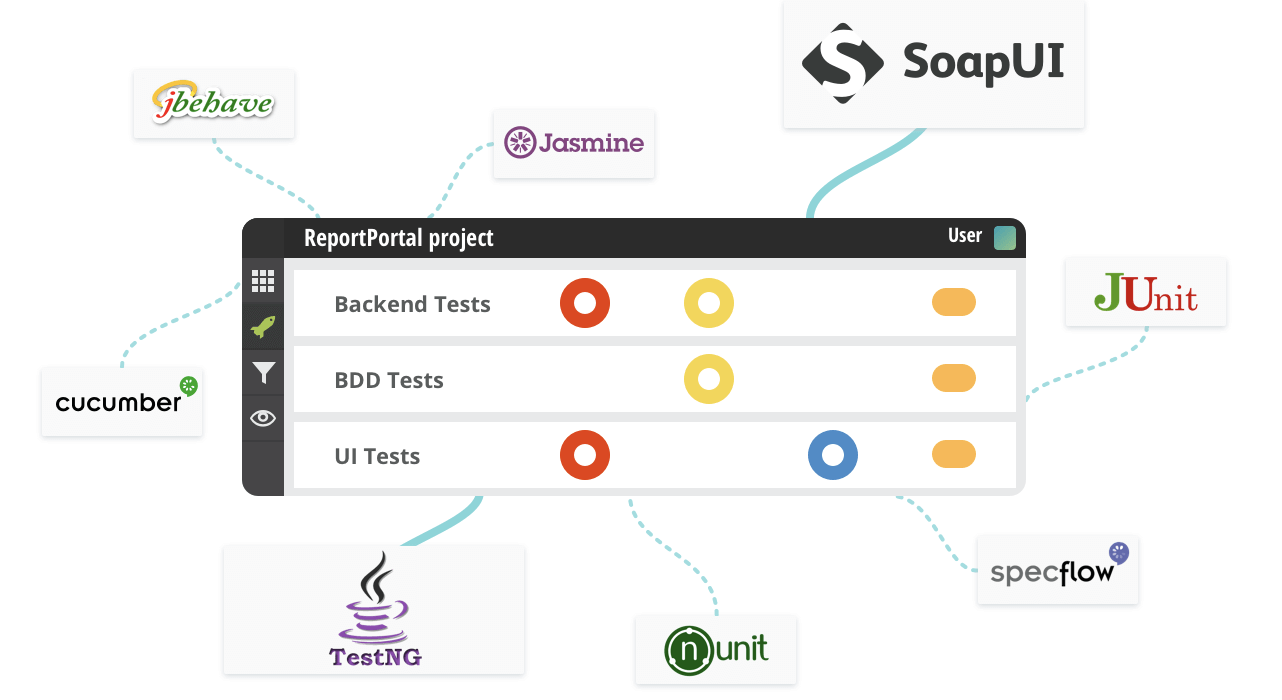
ReportPortal 是一个统一的自动化测试报告收集、分析、可视化平台,可以集成多种测试框架,比如 TestNG、Selenium 等等。ReportPortal 的主要特性有:
- 能轻易和多种测试框架集成;
- 实时展示测试情况;
- 所有的自动化测试结果在一个地方统一查看;
- 保留历史测试信息;
- 能和 bug 跟踪系统集成,比如 Jira;
ReportPortal 解决了什么问题
个人认为 ReportPortal 最大的价值在于报表的统一收集、查看、分析。假如没有 ReportPortal 工具,我们可能需要自己写脚本,或者 Jenkins 插件针对不同的测试框架装不同的插件,然后展示测试报告,但是 Jenkins 收集的测试报告只能在 Jenkins 平台查看。微服务拆分细、导致 Jenkins job 数量比较多,要看每次测试的报告要逐个点开进去查看,没有一个全局的地方查看。另外 Jenkins 本身的插件生态提供的测试报告收集不支持对历史测试报告的统一查询,如果有这种需求,基本不能满足。
ReportPortal 基本是全测试框架支持的统一报表收集、分析、可视化平台,能轻松解决上述存在的痛点。
ReportPortal 在 CI/CD 中扮演了什么角色
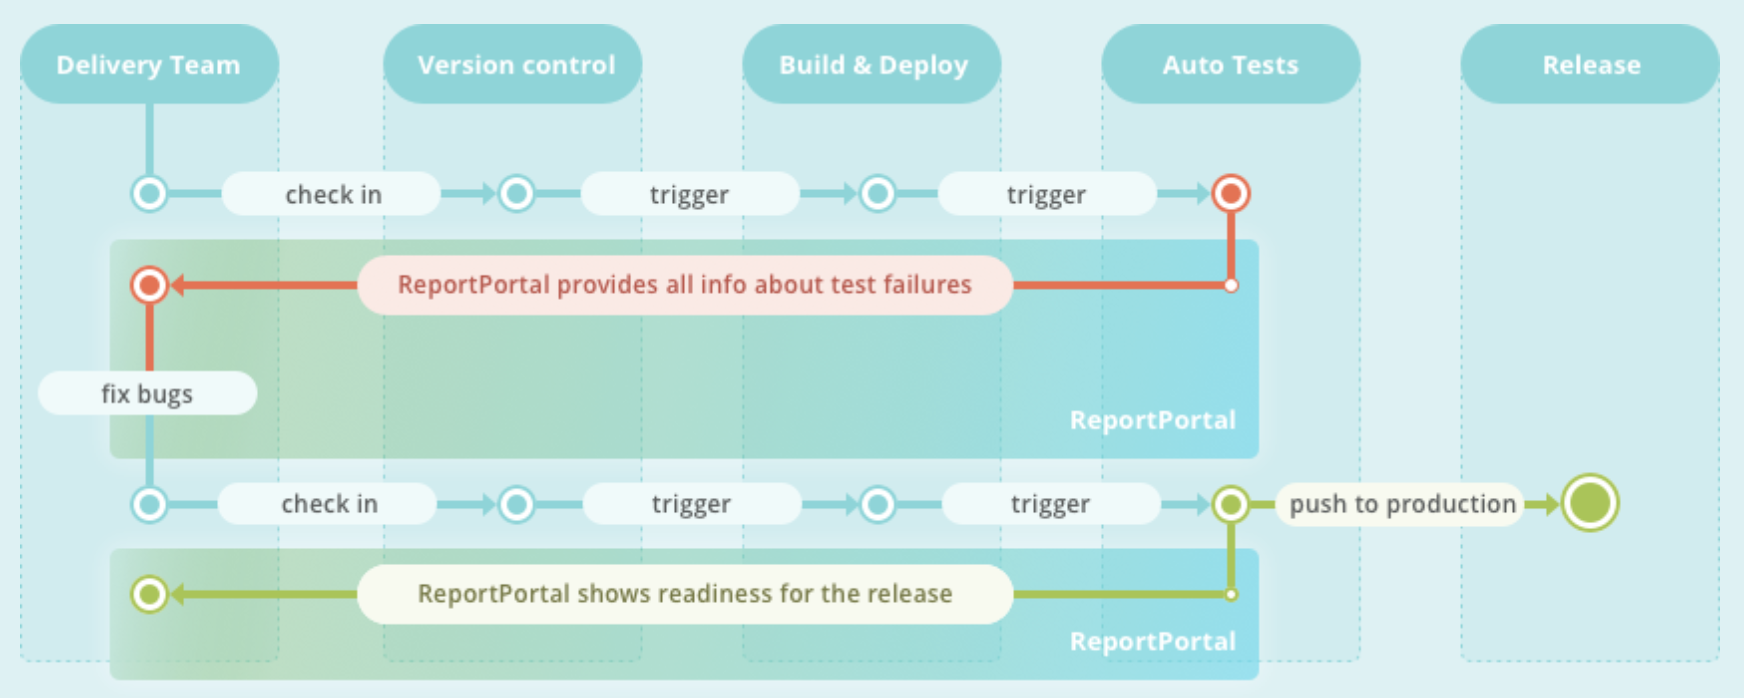
CI/CD 我们已经很熟悉了,但是如何将 CI/CD 与 CT 无缝整合,也许 ReportPortal 在 CI/CD 与 CT 的整合中扮演了重要角色。DevOps 的关键在于自动化统一标准、流程,根据 ReportPortal 的特性及本人的试用,发现 ReportPortal 真是对 CI/CD 完美的补充,整个交付流水线更加统一、规范、简洁、无缝衔接。
ReportPortal + TestNG + log4j 集成详细步骤
以一个基于 TestNG 测试框架的 java 工程为例说明,配置前 java 工程目录结构:1
2
3
4
5
6
7
8
9
10
11
12
13
14
15
16
17
18
19
20
21
22.
├── pom.xml
├── README.md
├── run.sh
└── src
├── main
│ ├── java
│ │ └── com
│ └── resources
│ ├── config.properties
│ ├── dev.yml
│ ├── log4j.properties
│ ├── log4testng.properties
│ ├── production.yml
│ ├── stage.yml
│ ├── test.yml
│ └── web.yml
└── test
├── java
│ └── com
└── resources
└── testng.xml
1. 配置工程 pom 文件
1.1 配置 ReportPortal 相关依赖远程仓库
1 | <repositories> |
1.2 添加一些依赖配置
testng 依赖1
2
3
4
5<dependency>
<groupId>org.testng</groupId>
<artifactId>testng</artifactId>
<version>6.11</version>
</dependency>
ReportPortal agent 的 testng 实现1
2
3
4
5<dependency>
<groupId>com.epam.reportportal</groupId>
<artifactId>agent-java-testng</artifactId>
<version>4.2.1</version>
</dependency>
添加 Rport Portal 的 log 包装以及 log4j 本身的配置1
2
3
4
5
6
7
8
9
10
11
12
13
14
15<dependency>
<groupId>com.epam.reportportal</groupId>
<artifactId>logger-java-log4j</artifactId>
<version>4.0.1</version>
</dependency>
<dependency>
<groupId>org.slf4j</groupId>
<artifactId>slf4j-log4j12</artifactId>
<version>1.7.26</version>
</dependency>
<dependency>
<groupId>log4j</groupId>
<artifactId>log4j</artifactId>
<version>1.2.17</version>
</dependency>
1.3 maven-surefire-plugin 插件配置
说明:
src/test/resources/testng.xml:tesng 执行测试用例时读取的文件,该文件指定执行哪些测试用例等信息;1
2
3
4
5
6
7
8
9
10
11
12
13
14
15
16
17<plugin>
<groupId>org.apache.maven.plugins</groupId>
<artifactId>maven-surefire-plugin</artifactId>
<version>2.22.0</version>
<configuration>
<testFailureIgnore>true</testFailureIgnore>
<suiteXmlFiles>
<suiteXmlFilexmlFile>src/test/resources/testng.xml</suiteXmlFilexmlFile>
</suiteXmlFiles>
<properties>
<property>
<name>usedefaultlisteners</name> <!-- disabling default listeners is optional -->
<value>false</value>
</property>
</properties>
</configuration>
</plugin>
1.4 maven-compiler-plugin 插件配置
1 | <plugin> |
2. TestNG 配置 RportPortal listener
testng testng.xml 文件添加 RportPortal 的 listener,文件:src/test/resources/testng.xml1
2
3<listeners>
<listener class-name="com.epam.reportportal.testng.ReportPortalTestNGListener"/>
</listeners>
3. 工程添加 ReportPortal resource
src/test/resources/ 目录添加 ReportPortal 配置文件:reportportal.properties
获取 ReportPortal 配置:
访问 ReportPortal UI—>点击右上角图标—>点击 Profile—>拷贝右下角框框中 REQUERED 配置。
将上面获取到的 ReportPortal 配置放到 src/test/resources/ 目录下reportportal.properties 文件:
示例文件内容:1
2
3
4rp.endpoint = http://reportIp:8080
rp.uuid = xxxxx
rp.launch = superadmin_TEST_EXAMPLE
rp.project = superadmin_personal
4. 配置 log4j 的 ReportPortal appender
src/test/resources/ 目录添加 log4j.xml 文件,主要是配置 log4j 的 ReportPortal appender,内容如下:1
2
3
4
5
6
7
8
9
10
11
12
13
14
15
16
17
18<?xml version="1.0" encoding="UTF-8" ?>
<!DOCTYPE log4j:configuration SYSTEM "log4j.dtd">
<log4j:configuration debug="true"
xmlns:log4j='http://jakarta.apache.org/log4j/'>
<appender name="ReportPortalAppender" class="com.epam.ta.reportportal.log4j.appender.ReportPortalAppender">
<layout class="org.apache.log4j.PatternLayout">
<param name="ConversionPattern" value="[%d{HH:mm:ss}] %-5p (%F:%L) - %m%n"/>
</layout>
</appender>
<logger name="com.epam.reportportal.apache">
<level value="OFF"/>
</logger>
<root>
<level value="info"/>
<appender-ref ref="ReportPortalAppender"/>
</root>
</log4j:configuration>
至此相关配置已完成,工程目录结构此时为:1
2
3
4
5
6
7
8
9
10
11
12
13
14
15
16
17
18
19
20
21
22
23
24.
├── pom.xml
├── README.md
├── run.sh
└── src
├── main
│ ├── java
│ │ └── com
│ └── resources
│ ├── config.properties
│ ├── dev.yml
│ ├── log4j.properties
│ ├── log4testng.properties
│ ├── production.yml
│ ├── stage.yml
│ ├── test.yml
│ └── web.yml
└── test
├── java
│ └── com
└── resources
├── log4j.xml
├── reportportal.properties
└── testng.xml
5. 执行 mvn clean test 测试
6. 到 ReportPortal 控制台观察新的 Launches 是否启动
每次测试会在 ReportPortal 平台对应触发一个 Launche,包含本次构建相关信息。
7. 创建 ReportPortal Dashboard,可视化测试报告
创建 ReportPortal 的 Dashboard 很简单,也很灵活,主要思想是 RP 提供了多种图表,然后每个图表配置条件,筛选出想要的 Launches 展示。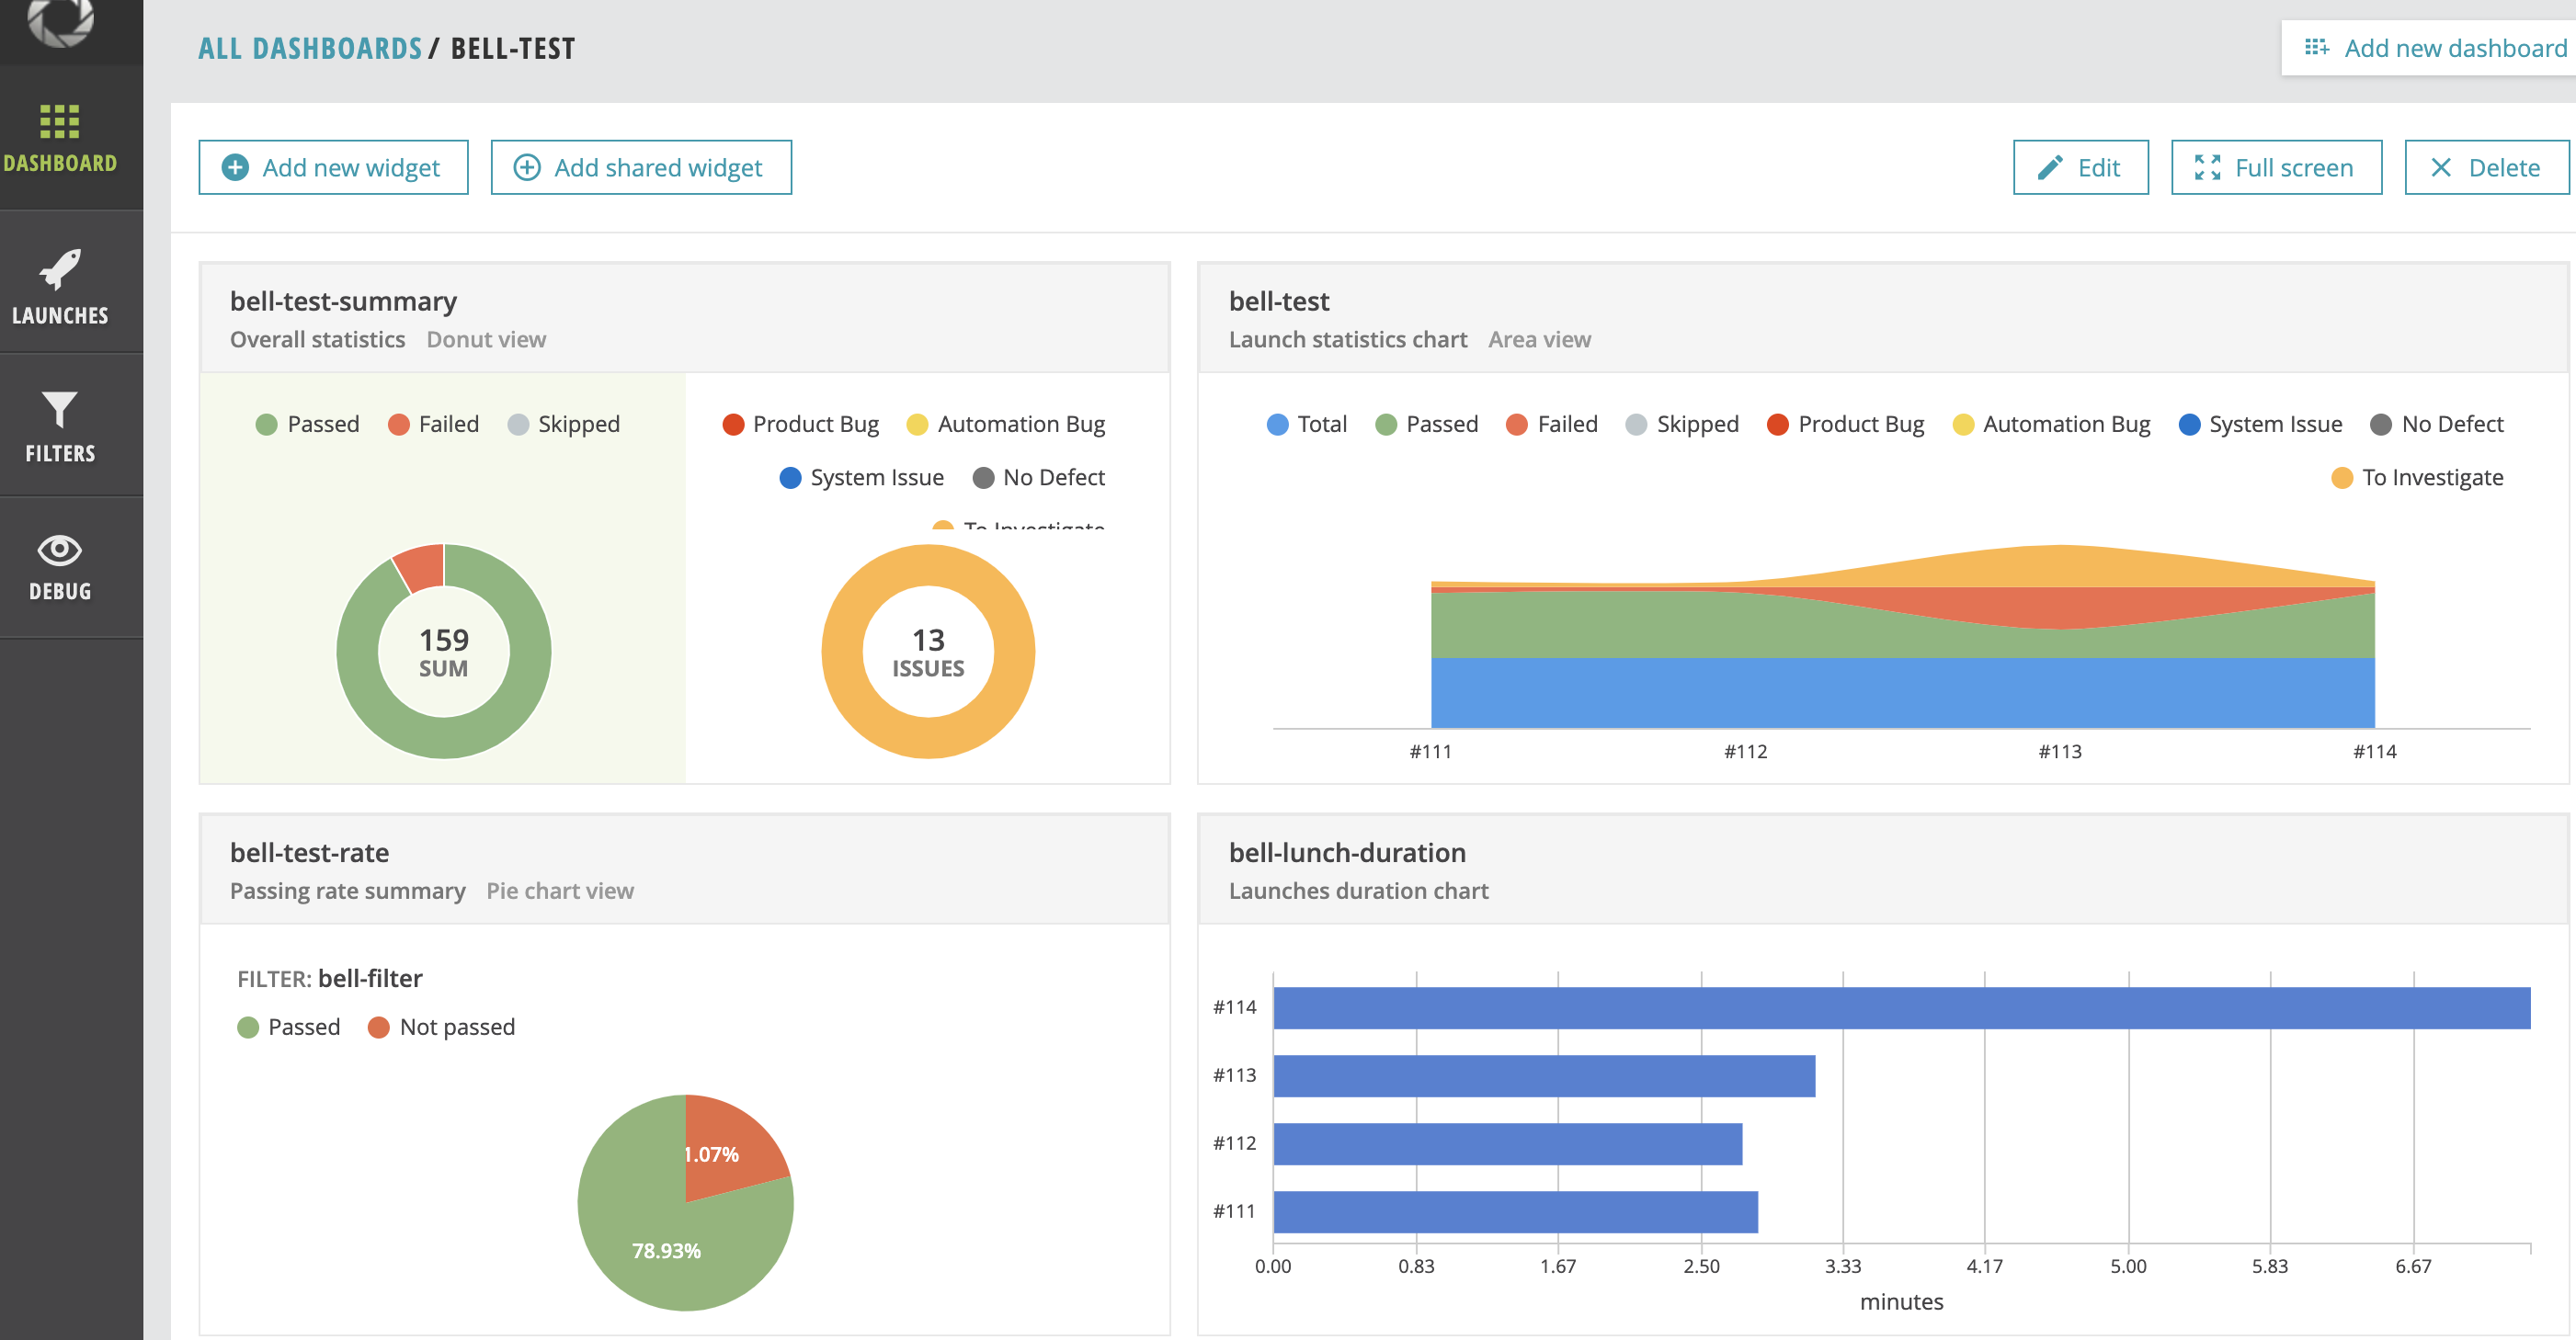
相关文档
https://reportportal.io/docs
https://github.com/reportportal/example-java-TestNG
Golang json 编解码
Json 编码
Json 编码的过程即为将程序的数据结构转化为 json 串的过程,比如 Golang 里面的结构体、Python 中的字典,这些有结构的数据转化为 json 串。在 Golang 中编码 Json 使用 encoding/json 包的 Marshal() 函数,函数原型为:1
func Marshal(v interface{}) ([]byte, error)
举例:将 Book 结构体对象编码为 json 串,然后输出到控制台1
2
3
4
5
6
7
8
9
10
11
12
13
14
15
16
17
18
19
20
21
22
23
24import (
"encoding/json"
"fmt"
)
type Book struct {
Title string
Authors []string
Publisher string
IsPublished bool
Price float64
}
func main() {
var gobook Book = Book{
"Go语言编程",
[]string{"XuShiwei", "HughLv"},
"ituring.com.cn",
true,
9.99,
}
b, _ := json.Marshal(gobook)
fmt.Println(string(b))
}
Json 解码
Json 解码的过程和编码刚好相反,将普通的 json 字符串转化为有结构的程序数据。比如将 json 串转化为 Golang 的结构体。在Golang 中解码 json 的函数为 encoding/json 包的 Unmarshal() 函数,函数原型为:1
func Unmarshal(data []byte, v interface{}) error
举例:将 json 字符串解码成 Golang Book 结构体对象,并打印每个字段的值1
2
3
4
5
6
7
8
9
10
11
12
13
14
15
16
17
18
19
20
21
22package main
import (
//"encoding/json"
"encoding/json"
"fmt"
)
type Book struct {
Title string
Authors []string
Publisher string
IsPublished bool
Price float64
}
func main() {
jsonStr := `{"Title":"Go语言编程","Authors":["XuShiwei","HughLv"],"Publisher":"ituring.com.cn","IsPublished":true,"Price":9.99}`
var book Book
json.Unmarshal([]byte(jsonStr), &book)
fmt.Println(book.Title, book.Authors, book.Publisher, book.IsPublished, book.Price)
}
使用 iperf 测试 Linux 服务器带宽
iperf 简介
iperf 是一个用于测试网络带宽的命令行工具,可以测试服务器的网络吞吐量。目前发现两个很实用的功能:
- 测试服务器网络吞吐量:如果我们需要知道某台服务器的「最大」网络带宽,那么最好在同区域找两台同等配置的机器测试,因为带宽测试结果和两节点的距离有关、也和运营商的限制有关、也和服务器 CPU 核数有关。
- 测试到服务端节点网速:如果我们想知道目前客户端到服务器的实际网速是多少,在服务器启动 iperf,客户端连接 iperf 服务端,测试结果就是当前客户端到服务器的真实网速。
工具安装
1 | yum install -y iperf |
iperf 选项参数
通用选项
1 | -f <kmKM> 报告输出格式。 [kmKM] format to report: Kbits, Mbits, KBytes, MBytes |
服务端选项
1 | -s iperf服务器模式 |
客户端选项
1 | -b , --bandwidth n[KM] 指定客户端通过UDP协议发送数据的带宽(bit/s)该参数只对 udp 测试有效。默认是1Mbit/s |
使用方法示例
准备两台服务器 A 和 B,并分别安装 iperf 命令行工具。
测试 A 服务器的出站带宽:在 B 服务器启动 iperf 服务端,A 服务器使用 iperf 连接 B 服务
器 iperf 服务端,这样测试的就是 A 服务器的出口带宽:1
2B: iperf -s -i 2 # 启动服务端
A: iperf -c <B_server_ip> -i 2 -t 60 # 客户端链接测试 A 服务器的入站带宽:在 A 服务器启动 iperf 服务的,B 服务器使用 iperf 连接 A 服务器 iperf 服务端,这样测试的就是 A 服务器的入口带宽。
1
2A: iperf -s -i 2 # 启动服务端
B: iperf -c <A_server_ip> -i 2 -t 60 # 客户端链接
测试结果示例
1 | [root@com26-83 ~]# iperf -c x.x.x.x -i 2 -t 60 |
相关文档
使用 Stunnel 隐藏 OpenVPN 流量
简介
众所周知的原因,在海外直接搭建 OpenVPN 根本无法使用(TCP 模式),或者用段时间就被墙了(UDP 模式)。本文主要介绍如何通过 Stunnel 隐藏 OpenVPN 流量,使其看起来像普通的 SSL 协议传输,从而绕过 gfw。
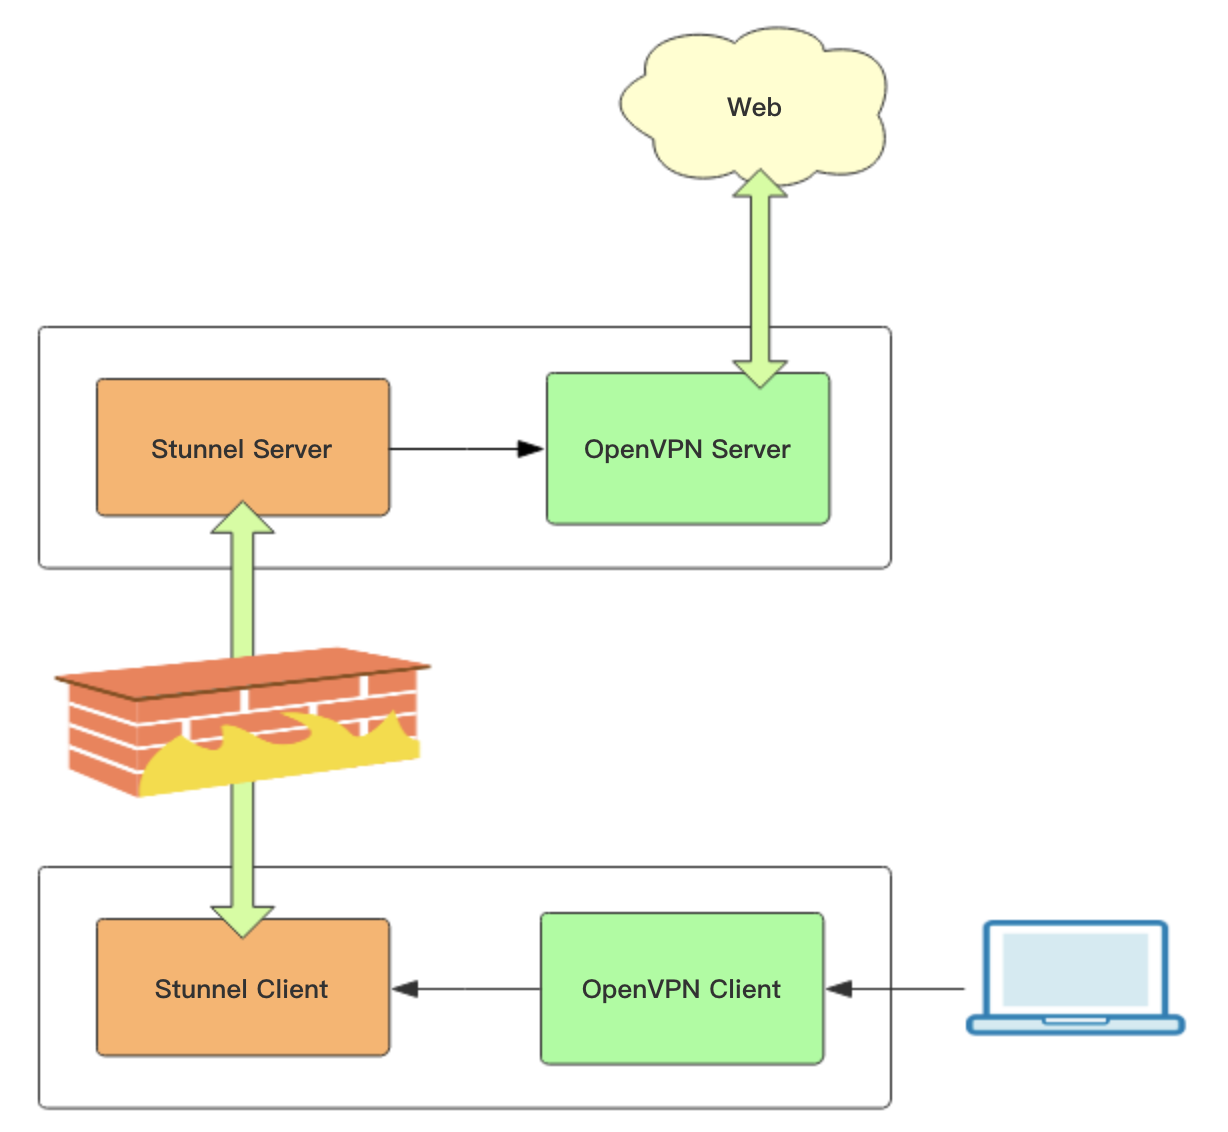
Stunnel 分为客户端和服务端,客户端负责接收用户 OpenVPN 客户端流量并转化成 SSL 协议加密数据包,然后转发给 Stunnel 服务端,实现 SSL 协议数据传输,服务端然后将流量转化成 OpenVPN 流量传输给 OpenVPN 服务端。因此我们可以在国内搭 Stunnel 客户端,国外搭 Stunnel 服务端。OpenVPN + Stunnel 整体架构如下:
Stunnel 隐藏 OpenVPN 流量具体过程
1. 首先需要有个 OpenVPN 服务端
关于 OpenVPN 的搭建及使用在这里不多说了,之前写过文章,详情见这里。这里要说明的是,Stunnel 不支持 udp 流量转换,所以 OpenVPN 需要以 TCP 模式运行。下面为 OpenVPN TCP 模式的配置示例:1
2
3
4
5
6
7
8
9
10
11
12
13
14
15
16
17
18
19
20
21
22
23
24
25port 4001 # 监听的端口号
proto tcp-server
dev tun
ca /etc/openvpn/server/certs/ca.crt # CA 根证书路径
cert /etc/openvpn/server/certs/server.crt # open VPN 服务器证书路径
key /etc/openvpn/server/certs/server.key # open VPN 服务器密钥路径,This file should be kept secret
dh /etc/openvpn/server/certs/dh.pem # Diffie-Hellman 算法密钥文件路径
tls-auth /etc/openvpn/server/certs/ta.key 0 # tls-auth key,参数 0 可以省略,如果不省略,那么客户端
# 配置相应的参数该配成 1。如果省略,那么客户端不需要 tls-auth 配置
server 10.8.0.0 255.255.255.0 # 该网段为 open VPN 虚拟网卡网段,不要和内网网段冲突即可。open VPN 默认为 10.8.0.0/24
push "dhcp-option DNS 8.8.8.8" # DNS 服务器配置,可以根据需要指定其他 ns
push "dhcp-option DNS 8.8.4.4"
push "redirect-gateway def1" # 客户端所有流量都通过 open VPN 转发,类似于代理开全局
compress lzo
duplicate-cn # 允许一个用户多个终端连接
keepalive 10 120
comp-lzo
persist-key
persist-tun
user openvpn # open VPN 进程启动用户,openvpn 用户在安装完 openvpn 后就自动生成了
group openvpn
log /var/log/openvpn/server.log # 指定 log 文件位置
log-append /var/log/openvpn/server.log
status /var/log/openvpn/status.log
verb 3
2. Stunnel 服务端安装配置
安装配置 Stunnel 服务端(海外节点):
1 | yum -y install stunnel |
说明:
accept = 443 # Stunnel 服务端监听端口
connect = 127.0.0.1:4001 # OpenVPN 服务端地址
使用 systemd 启动 Stunnel 服务端:
为了管理方便,我们使用 systemd 管理 Stunnel 服务,编辑一个 systemd unit 文件,vim /lib/systemd/system/stunnel.service:1
2
3
4
5
6
7
8
9
10
11
12
13
14
15
16
17
18
19[Unit]
Description=SSL tunnel for network daemons
After=network.target
After=syslog.target
[Install]
WantedBy=multi-user.target
Alias=stunnel.target
[Service]
Type=forking
ExecStart=/usr/bin/stunnel /etc/stunnel/stunnel.conf
ExecStop=/usr/bin/killall -9 stunnel
# Give up if ping don't get an answer
TimeoutSec=600
Restart=always
PrivateTmp=false
启动 Stunnel 服务端:1
2systemctl start stunnel.service
systemctl enable stunnel.service
3. Stunnel 客户端安装配置
Stunnel 的客户端安装和服务器一样,同样的软件,既可以作为客户端,也可以作为服务端,只是配置不同而已。
安装配置 Stunnel 客户端(国内节点):
1 | yum -y install stunnel |
说明:
accept=8443 # Stunnel 客户端监听端口
stunnel_server_ip:443 # stunnel 服务端 ip 及端口
使用 systemd 启动 Stunnel 客户端:
这里前面同服务端的操作过程,不再赘述。
启动 Stunnel 客户端:1
2systemctl start stunnel.service
systemctl enable stunnel.service
4. 使用 OpenVPN 连接 Stunnel
Stunnel + OpenVPN 都配好后,就可以使用 OpenVPN 客户端实现自由上网了,需要注意的是 OpenVPN 客户端现在需要连接的是 Stunnel 客户端,不再是直接连接 OpenVPN 服务端。
相关文档
Haproxy 从入门到掌握
简介
HAProxy 是一款开源且免费的反向代理软件,为基于 TCP 和 HTTP 的应用提供高可用、负载均衡和代理功能。它特别适用于流量非常大的网站,为世界上访问量最大的网站提供了强大的支持。多年来,HAProxy 已经成为事实上的标准开源负载均衡器,大多数主流的 Linux 发行版已经自带了该安装包,并且在云平台也经常被使用。
HAProxy 是一个纯粹的反向代理软件,与 nginx 不同的是 haproxy 没有 web 服务功能,而且同时支持 4 层和 7 层代理。Nginx 从 1.9.0 才开始支持 4 层代理,通过 stream 模块支持,该模块默认不会自带安装,需要编译安装的时候手动添加上这个模块。
HAProxy的核心功能:
- 负载均衡:L4 和 L7 两种模式,支持 RR/静态RR/LC/IP Hash/URI Hash/URL_PARAM Hash/HTTP_HEADER Hash等丰富的负载均衡算法;
- 健康检查:支持 TCP 和 HTTP 两种健康检查模式;
- 会话保持:对于未实现会话共享的应用集群,可通过 Insert Cookie/Rewrite Cookie/Prefix Cookie,以及上述的多种 Hash 方式实现会话保持;
- SSL:HAProxy 可以解析 HTTPS 协议,并能够将请求解密为 HTTP 后向后端传输;
- HTTP请求重写与重定向;
- 监控与统计:HAProxy提供了基于 Web 的统计信息页面,展现健康状态和流量数据。基于此功能,使用者可以开发监控程序来监控 HAProxy 的状态;
Centos7 下安装 HAProxy
1 | wget http://www.haproxy.org/download/1.8/src/haproxy-1.8.20.tar.gz |
使用 HAProxy 搭建一个 L4 层代理
这里使用 HAProxy 转发流量到后台 3 个 Shadowsocks 节点的 1443/tcp 端口,并配有 TCP 健康检查机制:
HAProxy 的 L4 层代理配置很简单,定义一对 frontend 和 backend,frontend 为 haproxy 前端监听的端口,backend 为后端服务器节点,我们访问 haproxy 不同的端口即可访问到对应的后端服务。frontend 和 backend 通过 default_backend 后面的名称关联。其他的配置项说明见下面配置文件 haproxy.cfg 中注释说明:
新建一个 HAProxy 配置文件:
mkdir /etc/haproxy
vim /etc/haproxy/haproxy.cfg 填入如下内容:
haproxy.cfg:1
2
3
4
5
6
7
8
9
10
11
12
13
14
15
16
17
18
19
20
21
22
23
24
25
26
27
28
29
30
31
32
33
34
35
36
37
38
39
40
41
42
43
44
45
46
47
48
49#
# demo config for Proxy mode
#
# global 为全局配置项,主要和 haproxy 进程本身有关。defaults 为默认配置,当后面的 listen、frontend、banckend 等块没有再次指明相关配置时,会继承 defaults 的配置。
global
maxconn 20000 #最大连接数
ulimit-n 204800 #ulimit的数量限制
log 127.0.0.1 local3
user haproxy
group haproxy
chroot /var/empty
nbproc 4 #启动后运行的进程数量
daemon #以后台形式运行haproxy
pidfile /var/run/haproxy.pid
defaults
log global
mode tcp
retries 3 #3次连接失败认为服务不可用,也可以在后面设置
timeout connect 5s #连接超时
timeout client 30s #客户端超时
timeout server 30s #服务器端超时
option redispatch
option nolinger
no option dontlognull
option tcplog
option log-separate-errors
listen admin_stats #监控页面设置
bind 0.0.0.0:26000 # 监控页面监听端口号
bind-process 1
mode http
log 127.0.0.1 local3 err
stats refresh 30s ##每隔30秒自动刷新监控页面
stats uri /admin
stats realm welcome login\ Haproxy
stats auth admin:123456
stats hide-version
stats admin if TRUE
frontend shadowsocks
bind *:1443
default_backend shadowsocks
backend shadowsocks
# balance roundrobin #负载均衡的方式,roundrobin是轮询
# check inter 1500 心跳检测频率, rise 3 是3次正确认为服务器可用,fall 3是3次失败认为服务器不可用
server ss-node-1 192.168.0.1:1443 check inter 1500 rise 3 fall 3
server ss-node-1 192.168.0.2:1443 check inter 1500 rise 3 fall 3
server ss-node-1 192.168.0.3:1443 check inter 1500 rise 3 fall 3
测试配置文件是否有效1
haproxy -f /etc/haproxy/haproxy.cfg -c
启动 HAProy 服务:1
haproxy -f /etc/haproxy/haproxy.cfg
我们还可以访问 HAProxy 自带的监控页面:上面我们配置的访问地址为 haproxy_ip:26000/admin,账号:admin,密码:123456。HAProxy 自带的监控页面特别好用,可以看到每个后端节点的流量使用情况、在线状态、可以随时将节点从后端集群中剔除或者改变状态。

相关文档
http://www.haproxy.org/ | HAProxy 官网
https://www.jianshu.com/p/c9f6d55288c0 | HAProxy从零开始到掌握
https://www.jianshu.com/p/17c2f87bb27f | 简述Haproxy常见的负载均衡调度算法及应用场景详解
https://www.serverlab.ca/tutorials/linux/network-services/how-to-configure-haproxy-health-checks/ | HAProxy 健康检查配置
Cenos7 下搭建 OpenVPN 过程记录
![]()
OpenVPN 服务端安装配置
由于不同环境及软件版本命令使用略有差异,特别是 easy-rsa 的使用在 2.0 和 3.0 的差别有点大,所以在此先说明下安装环境及相关软件版本:
- 系统平台:Centos7
- OpenVPN 版本:2.4.7
- easy-rsa 版本:3.0.3
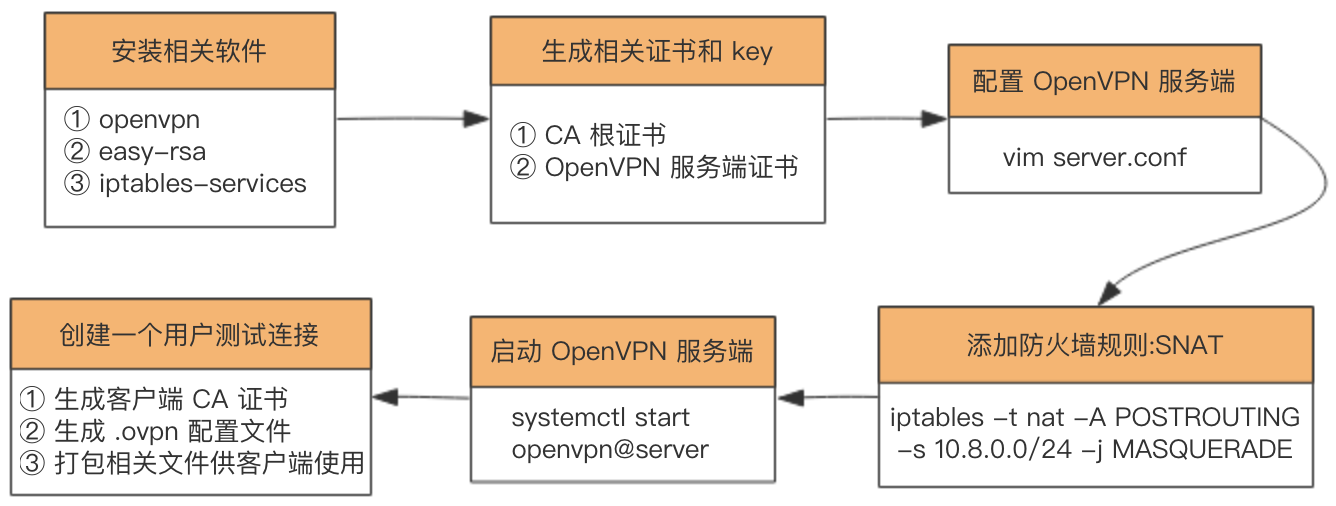
尽管不同环境及软件版本命令使用略有所差异,但是整个搭建过程都是一致的:
安装相关软件—>生成相关证书:CA 根证书、服务器证书—>配置 open VPN 服务端—>添加防火墙规则:snat—>启动 open VPN 服务端—>创建一个用户测试连接:创建客户端 CA 证书、生成 .ovpn 配置文件、打包相关文件供客户端使用。
1.安装 openvpn、easy-rsa、iptables-services1
2yum -y install epel-release
yum -y install openvpn easy-rsa iptables-services
2.使用 easy-rsa 生成需要的证书及相关文件,在这个阶段会产生一些 key 和证书:
- CA 根证书
- OpenVPN 服务器 ssl 证书
- Diffie-Hellman 算法用到的 key
2.1 将 easy-rsa 脚本复制到 /etc/openvpn/,该脚本主要用来方便地生成 CA 证书和各种 key1
cp -r /usr/share/easy-rsa/ /etc/openvpn/
2.2 跳到 easy-rsa 目录并编辑 vars 文件,添加一些生成证书时用到的变量1
2
3
4
5
6
7
8cd /etc/openvpn/easy-rsa/<easy-rsa 版本号>/ # 查看 easy-rsa 版本号:yum info easy-rsa
vim vars # 没这个文件的话新建,填写如下内容(变量值根据实际情况随便填写):
export KEY_COUNTRY="***"
export KEY_PROVINCE="***"
export KEY_CITY="***"
export KEY_ORG="***"
export KEY_EMAIL="***"
source ./vars # 使变量生效
2.3 生成 CA 根证书1
2./easyrsa init-pki #初始化 pki 相关目录
./easyrsa build-ca nopass #生成 CA 根证书, 输入 Common Name,名字随便起。
2.4 生成 OpenVPN 服务器证书和密钥
第一个参数 server 为证书名称,可以随便起,比如 ./easyrsa build-server-full openvpn nopass1
./easyrsa build-server-full server nopass
2.5 生成 Diffie-Hellman 算法需要的密钥文件1
./easyrsa gen-dh #创建Diffie-Hellman,这可能得等一小会儿
2.6 生成 tls-auth key,这个 key 主要用于防止 DoS 和 TLS 攻击,这一步其实是可选的,但为了安全还是生成一下,该文件在后面配置 open VPN 时会用到。1
openvpn --genkey --secret ta.key
2.7 将上面生成的相关证书文件整理到 /etc/openvpn/server/certs (这一步完全是为了维护方便)1
2
3
4
5
6mkdir /etc/openvpn/server/certs && cd /etc/openvpn/server/certs/
cp /etc/openvpn/easy-rsa/3/pki/dh.pem ./ # SSL 协商时 Diffie-Hellman 算法需要的 key
cp /etc/openvpn/easy-rsa/3/pki/ca.crt ./ # CA 根证书
cp /etc/openvpn/easy-rsa/3/pki/issued/server.crt ./ # open VPN 服务器证书
cp /etc/openvpn/easy-rsa/3/pki/private/server.key ./ # open VPN 服务器证书 key
cp /etc/openvpn/easy-rsa/3/ta.key ./ # tls-auth key
2.8 创建 open VPN 日志目录1
2mkdir -p /var/log/openvpn/
chown openvpn:openvpn /var/log/openvpn
3.配置 OpenVPN
可以从 /usr/share/doc/openvpn-cd /etc/openvpn/vim server.conf 填入如下内容(很多配置项不需要特别了解,重要的配置这里注释出来了,其他相关配置项想了解的话见 这里):
server.conf:1
2
3
4
5
6
7
8
9
10
11
12
13
14
15
16
17
18
19
20
21
22
23
24
25
26port 1194 # 监听的端口号
proto udp # 服务端用的协议,udp 能快点,所以我选择 udp
dev tun
ca /etc/openvpn/server/certs/ca.crt # CA 根证书路径
cert /etc/openvpn/server/certs/server.crt # open VPN 服务器证书路径
key /etc/openvpn/server/certs/server.key # open VPN 服务器密钥路径,This file should be kept secret
dh /etc/openvpn/server/certs/dh.pem # Diffie-Hellman 算法密钥文件路径
tls-auth /etc/openvpn/server/certs/ta.key 0 # tls-auth key,参数 0 可以省略,如果不省略,那么客户端
# 配置相应的参数该配成 1。如果省略,那么客户端不需要 tls-auth 配置
server 10.8.0.0 255.255.255.0 # 该网段为 open VPN 虚拟网卡网段,不要和内网网段冲突即可。open VPN 默认为 10.8.0.0/24
push "dhcp-option DNS 8.8.8.8" # DNS 服务器配置,可以根据需要指定其他 ns
push "dhcp-option DNS 8.8.4.4"
push "redirect-gateway def1" # 客户端所有流量都通过 open VPN 转发,类似于代理开全局
compress lzo
duplicate-cn # 允许一个用户多个终端连接
keepalive 10 120
comp-lzo
persist-key
persist-tun
user openvpn # open VPN 进程启动用户,openvpn 用户在安装完 openvpn 后就自动生成了
group openvpn
log /var/log/openvpn/server.log # 指定 log 文件位置
log-append /var/log/openvpn/server.log
status /var/log/openvpn/status.log
verb 3
explicit-exit-notify 1
4.防火墙相关配置(使用 iptables 添加 snat 规则)
4.1 禁用 Centos7 默认的 firewalld,使用经典的 iptables 防火墙管理软件:1
2systemctl stop firewalld
systemctl mask firewalld
4.2 禁用 SELinux
马上关闭:setenforce 0 | 马上生效
永久关闭:sed -i ‘s/SELINUX=enforcing/SELINUX=disabled/g’ /etc/selinux/config | 需要重启服务器生效
4.3 启用iptables1
2
3systemctl enable iptables
systemctl start iptables
iptables -F # 清理所有防火墙规则
4.4 添加防火墙规则,将 openvpn 的网络流量转发到公网:snat 规则1
2iptables -t nat -A POSTROUTING -s 10.8.0.0/24 -j MASQUERADE
iptables-save > /etc/sysconfig/iptables # iptables 规则持久化保存
4.5 Linux 服务器启用地址转发1
2echo net.ipv4.ip_forward = 1 >> /etc/sysctl.conf
sysctl -p # 这一步一定得执行,否则不会立即生效。
5.启动 open VPN1
2
3systemctl start openvpn@server # 启动
systemctl enable openvpn@server # 开机自启动
systemctl status openvpn@server # 查看服务状态
添加一个 OpenVPN 用户
OpenVPN 服务端搭建完了,但是我们该如何使用呢?下面以 Mac 平台下使用为例:
要连接到 open VPN 服务端首先得需要一个客户端软件,在 Mac 下推荐使用 Tunnelblick,下载地址:https://tunnelblick.net/。Tunnelblick 是一个开源、免费的 Mac 版 open VPN 客户端软件。
接下来在服务端创建一个 open VPN 用户:其实创建用户的过程就是生成客户端 SSL 证书的过程,然后将其他相关的证书文件、key、.ovpn 文件(客户端配置文件)打包到一起供客户端使用。由于创建一个用户的过程比较繁琐,所以在此将整个过程写成了一个脚本 ovpn_user.sh,脚本内容比较简单,一看就懂:
首先创建一个客户端配置模板文件 sample.ovpn,该文件在脚本中会用到,放到 /etc/openvpn/client/ 目录,内容如下:
sample.ovpn:1
2
3
4
5
6
7
8
9
10
11
12
13
14client
proto udp
dev tun
remote [open VPN服务端公网 ip,根据实际情况填写] 1194
ca ca.crt
cert admin.crt
key admin.key
tls-auth ta.key 1
remote-cert-tls server
persist-tun
persist-key
comp-lzo
verb 3
mute-replay-warnings
下面为创建 open VPN 用户脚本:
./ovpn_user.sh:1
2
3
4
5
6
7
8
9
10
11
12
13
14
15
16
17
18
19
20
21
22
23
24
25
26
27
28
29
30
31# ! /bin/bash
set -e
OVPN_USER_KEYS_DIR=/etc/openvpn/client/keys
EASY_RSA_VERSION=3
EASY_RSA_DIR=/etc/openvpn/easy-rsa/
PKI_DIR=$EASY_RSA_DIR/$EASY_RSA_VERSION/pki
for user in "$@"
do
if [ -d "$OVPN_USER_KEYS_DIR/$user" ]; then
rm -rf $OVPN_USER_KEYS_DIR/$user
rm -rf $PKI_DIR/reqs/$user.req
sed -i '/'"$user"'/d' $PKI_DIR/index.txt
fi
cd $EASY_RSA_DIR/$EASY_RSA_VERSION
# 生成客户端 ssl 证书文件
./easyrsa build-client-full $user nopass
# 整理下生成的文件
mkdir -p $OVPN_USER_KEYS_DIR/$user
cp $PKI_DIR/ca.crt $OVPN_USER_KEYS_DIR/$user/ # CA 根证书
cp $PKI_DIR/issued/$user.crt $OVPN_USER_KEYS_DIR/$user/ # 客户端证书
cp $PKI_DIR/private/$user.key $OVPN_USER_KEYS_DIR/$user/ # 客户端证书密钥
cp /etc/openvpn/client/sample.ovpn $OVPN_USER_KEYS_DIR/$user/$user.ovpn # 客户端配置文件
sed -i 's/admin/'"$user"'/g' $OVPN_USER_KEYS_DIR/$user/$user.ovpn
cp /etc/openvpn/server/certs/ta.key $OVPN_USER_KEYS_DIR/$user/ta.key # auth-tls 文件
cd $OVPN_USER_KEYS_DIR
zip -r $user.zip $user
done
exit 0
执行上面脚本创建一个用户:sh ovpn_user.sh <username>,会在 /etc/openvpn/client/keys 目录下生成以用户名命名的 zip 打包文件,将该压缩包下载到本地解压,然后将里面的 .ovpn 文件拖拽到 Tunnelblick 客户端软件即可使用。
压缩包里面文件有如下,示例:1
2
3
4
5
6.
├── ca.crt
├── username.crt
├── username.key
├── username.ovpn
└── ta.key
删除一个 OpenVPN 用户
上面我们知道了如何添加一个用户,那么如果公司员工离职了或者其他原因,想删除对应用户 OpenVPN 的使用权,该如何操作呢?其实很简单,OpenVPN 的客户端和服务端的认证主要通过 SSL 证书进行双向认证,所以只要吊销对应用户的 SSL 证书即可。
编辑 OpenVPN 服务端配置 server.conf 添加如下配置:
1
crl-verify /etc/openvpn/easy-rsa/3/pki/crl.pem
吊销用户证书,假设要吊销的用户名为 username
1
2
3cd /etc/openvpn/easy-rsa/3/
./easyrsa revoke username
./easyrsa gen-crl重启 OpenVPN 服务端使其生效
1
systemctl start openvpn@server
为了方便,也将上面步骤整理成了一个脚本,可以一键删除用户:
del_ovpn_user.sh:1
2
3
4
5
6
7
8
9
10
11
12
13
14
15
16
17
18# ! /bin/bash
set -e
OVPN_USER_KEYS_DIR=/etc/openvpn/client/keys
EASY_RSA_VERSION=3
EASY_RSA_DIR=/etc/openvpn/easy-rsa/
for user in "$@"
do
cd $EASY_RSA_DIR/$EASY_RSA_VERSION
echo -e 'yes\n' | ./easyrsa revoke $user
./easyrsa gen-crl
# 吊销掉证书后清理客户端相关文件
if [ -d "$OVPN_USER_KEYS_DIR/$user" ]; then
rm -rf $OVPN_USER_KEYS_DIR/${user}*
fi
systemctl restart openvpn@server
done
exit 0
安装过程中遇到的问题及解决方法
问题 1:open VPN 客户端可以正常连接到服务端,但是无法上网,ping 任何地址都不通,只有服务端公网 ip 可以 ping 通。
问题原因及解决方法:主要原因是服务的地址转发功能没打开,其实我前面配置
了 echo net.ipv4.ip_forward = 1 >> /etc/sysctl.conf,但是没有执行 sysctl -p 使其
立即生效,所以才导致出现问题。因此一定要记得两条命令都要执行。
问题 2: open VPN 可以正常使用,但是看客户端日志却有如下错误:
1 | 2019-06-15 02:39:03.957926 AEAD Decrypt error: bad packet ID (may be a replay): [ #6361 ] -- see the man page entry for --no-replay and --replay-window for more info or silence this warning with --mute-replay-warnings |
问题原因及解决方法:
其实这个问题一般在 open VPN 是 UDP 服务的情况下出现,主要原因是 UDP 数据包重复发送导致,在 Wi-Fi 网络下经常出现,这并不影响使用,但是我们可以选择禁止掉该错误:根据错误提示可知使用 –mute-replay-warnings 参数可以消除该警告,我们使用的 open VPN 是 GUI 的,所以修改客户端 .ovpn 配置文件,末尾添加:mute-replay-warnings 即可解决。
该问题在这里有讨论:
https://sourceforge.net/p/openvpn/mailman/message/10655695/
相关文档
关于 open VPN 客户端和服务端配置文件配置项说明:很全面,可以随时查看不懂的配置项
https://community.openvpn.net/openvpn/wiki/Openvpn24ManPage
https://openvpn.net/ | OpenVPN 官网
https://www.fandenggui.com/post/centos7-install-openvpn.html | Centos7 安装 OpenVPN
https://www.howtoing.com/how-to-install-openvpn-on-centos-7 | Centos7 安装 OpenVPN
https://www.xiaohui.com/dev/server/20070904-revoke-openvpn-client.htm | 吊销客户端证书
https://scott.stevensononthe.net/2015/02/how-to-addremove-additional-users-to-openvpn/ | 吊销客户端证书
https://tunnelblick.net/cConnectedBut.html | open VPN 一些常见问题
https://tunnelblick.net/ipinfo | 本地公网 ip 查看
使用 ansible 模板化 haproxy 配置文件
今天使用 ansible 自动化一些日常工作,其中包括 haproxy 的配置变更,我们 haproxy 里面定义了很多 frontend 和 backend,猛一看还不好模版化,其实仔细研究一下发现完全可以通过模板的循环语法动态生成配置文件,在此分享下。首先看一下未模板化时的原始配置:haproxy.cfg:1
2
3
4
5
6
7
8
9
10
11
12
13
14
15
16
17
18
19
20
21
22
23
24
25
26
27
28
29
30
31
32
33
34
35
36
37
38
39
40
41
42
43
44
45
46
47
48
49
50
51global
maxconn 20000
ulimit-n 204800
log 127.0.0.1 local3
user haproxy
group haproxy
chroot /var/empty
nbproc 4 #启动后运行的进程数量
daemon #以后台形式运行haproxy
pidfile /var/run/haproxy.pid
defaults
log global
mode tcp
retries 3 #3次连接失败认为服务不可用,也可以在后面设置
timeout connect 5s #连接超时
timeout client 30s #客户端超时
timeout server 30s #服务器端超时
option redispatch
option nolinger
no option dontlognull
option tcplog
option log-separate-errors
listen admin_stats #监控页面设置
bind 0.0.0.0:26000
bind-process 1
mode http
log 127.0.0.1 local3 err
stats refresh 30s #每隔30秒自动刷新监控页面
stats uri /admin
stats realm welcome login\ Haproxy
stats auth admin:123456
stats hide-version
stats admin if TRUE
# 通过配置文件动态生成 hproxy 配置
frontend redis
bind *:6379
default_backend redis
backend redis
server 10.1.1.1:6379 10.1.1.1:6379 check inter 1500 rise 3 fall 3
frontend es
bind *:9300
default_backend es
backend es
server 10.1.1.2:9300 10.1.1.2:9300 check inter 1500 rise 3 fall 3
frontend mysql
bind *:3306
default_backend mysql
backend mysql
server 10.1.1.3:3306 10.1.1.3:3306 check inter 1500 rise 3 fall 3
观察可以发现 frontend 和 backend 是成对出现的,一对为一个完整的配置,所以可以将 frontend 和 backend 对抽象为一个变量列表的元素,我们通过定义一个 ansible 变量列表循环生成同样的配置即可。变量具体定义如下(haproxy_servers 变量),下面为一个完整的测试 playbook。playbook.yml:1
2
3
4
5
6
7
8
9
10
11
12
13
14
15
16
17
18
19
20
21
22
23
24
25
26---
- name: Test Playbook...
hosts: all
become: yes
gather_facts: no
vars:
haproxy_servers:
- frontend: 'redis'
bind_port: 6379
backend:
- address: 10.1.1.1:6379
- frontend: 'es'
bind_port: 9300
backend:
- address: 10.1.1.2:9300
- frontend: 'mysql'
bind_port: 3306
backend:
- address: 10.1.1.3:3306
tasks:
- name: Generate haproxy config
template:
src: haproxy.j2
dest: /tmp/haproxy.cfg
mode: 0644
force: yes
接下来我们看看模板文件 haproxy.j2 的定义:主要通过 jinja2 模板的循环语法遍历 haproxy_servers 变量生成 haproxy 配置。haproxy.j2:1
2
3
4
5
6
7
8
9
10
11
12
13
14
15
16
17
18
19
20
21
22
23
24
25
26
27
28
29
30
31
32
33
34
35
36
37
38
39
40
41
42
43
44
45global
maxconn 20000
ulimit-n 204800
log 127.0.0.1 local3
user haproxy
group haproxy
chroot /var/empty
nbproc 4 #启动后运行的进程数量
daemon #以后台形式运行haproxy
pidfile /var/run/haproxy.pid
defaults
log global
mode tcp
retries 3 #3次连接失败认为服务不可用,也可以在后面设置
timeout connect 5s #连接超时
timeout client 30s #客户端超时
timeout server 30s #服务器端超时
option redispatch
option nolinger
no option dontlognull
option tcplog
option log-separate-errors
listen admin_stats #监控页面设置
bind 0.0.0.0:26000
bind-process 1
mode http
log 127.0.0.1 local3 err
stats refresh 30s #每隔30秒自动刷新监控页面
stats uri /admin
stats realm welcome login\ Haproxy
stats auth admin:123456
stats hide-version
stats admin if TRUE
# 通过配置文件动态生成 hproxy 配置
{% for frontend in haproxy_servers %}
frontend {{ frontend.frontend }}
bind *:{{ frontend.bind_port }}
default_backend {{ frontend.frontend }}
backend {{ frontend.frontend }}
{% for backend in frontend.backend %}
server {{ backend.address }} {{ backend.address }} check inter 1500 rise 3 fall 3
{% endfor %}
{% endfor %}
测试下模板化结果?:我一般用 vagrant + ansible 测试 ansible 脚本,所以直接执行 vagrant rsync && vagrant provision 即可看到效果。关于 vagrant + ansible 的最佳实践请戳之前的这篇文章:使用 Vagrant 调试 Ansible Playbook。
如何在 Centos7 使用 iptables

从 Red Hat Enterprise Linux (RHEL) 7 和 CentOS 7 开始,firewalld 便作为系统默认的防火墙软件,替代之前的 iptables。firewalld 使用 firewall-cmd 命令管理防火墙规则,但是对于习惯了 iptables 的用户来说更倾向于使用传统的 iptables 方式,因为没有学习成本,能马上使用。即便 iptables 不再是 RHEL 7 和 CentOS 7 默认的防火墙管理软件,但是它们并没有完全屏蔽 iptables,通过安装依然可以使用。
简单说下 iptables 和 firewalld 区别
- firewalld 是 Red Hat Enterprise Linux (RHEL) 7 和 CentOS 7 开始开始引进的防火墙管理软件;
- firewalld 可以动态修改单条规则,而不需要像iptables那样,在修改了规则后必须得全部刷新才可以生效;
- firewalld 在使用上要比 iptables 人性化很多,即使不明白“五张表五条链”而且对 TCP/IP 协议不理解也可以实现大部分功能;
- firewalld 需要每个服务都去设置才能放行,因为默认是拒绝。而 iptables 里默认是每个服务是允许,需要拒绝的才去限制;
- firewalld 自身并不具备防火墙的功能,而是和 iptables 一样需要通过内核的 netfilter 来实现,也就是说 firewalld 和 iptables一样,他们的作用都是用于维护规则,而真正使用规则干活的是内核的 netfilter,只不过 firewalld 和 iptables 的结构以及使用方法不一样罢了;
- firewalld 底层调用的命令仍然是 iptables;
下图是 iptables 和 firewalld 的关系: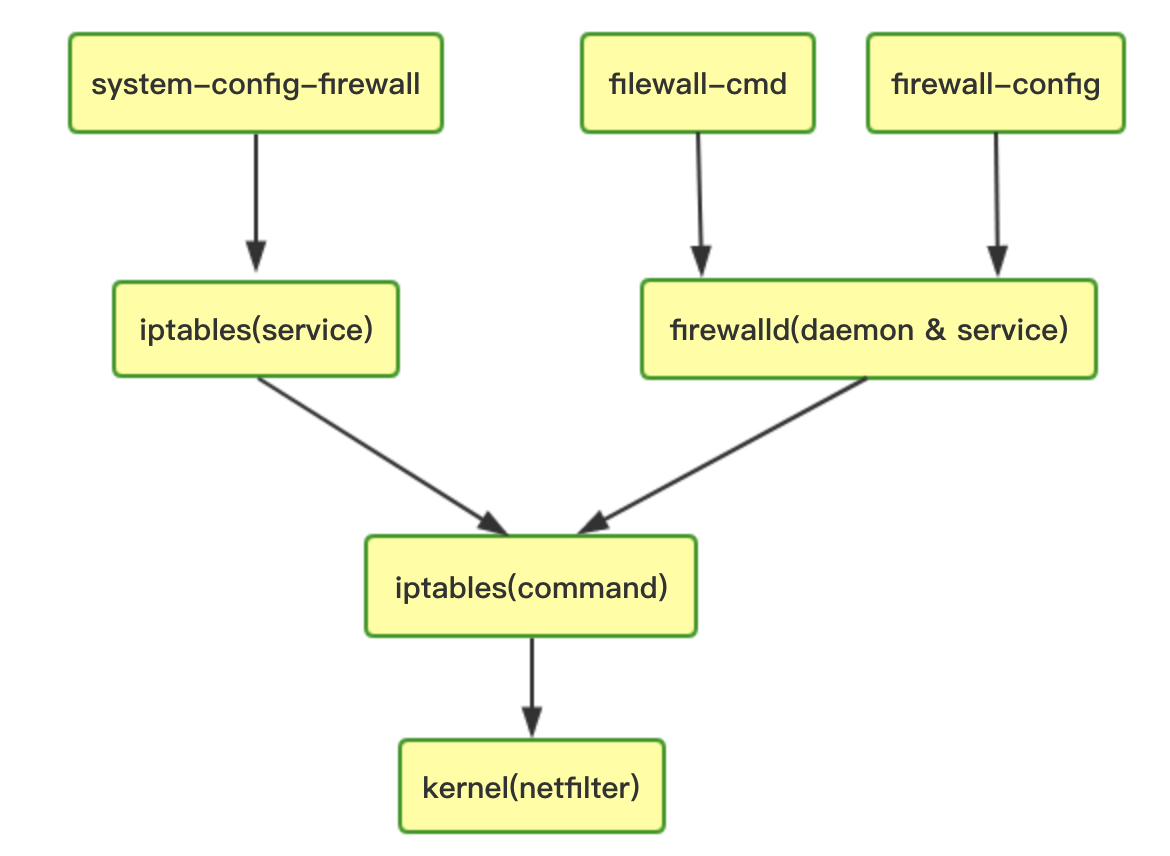
下面我们介绍下如何在 Centos7 系统下继续使用传统的 iptables 来管理防火墙规则。
关闭并注销 systemd 管理的 firewalld 服务
1 | $ systemctl stop firewalld |
安装并配置 iptables
安装 iptables 命令行工具
1
$ yum install -y iptables
安装 iptables 服务(安装后默认归 systemd 管理)
1
$ yum install -y iptables-services
这一步
iptables-services安装完后会自动生成 iptables 的规则文件:/etc/sysconfig/iptables设置开机自启动
1
$ systemctl enable iptables
启动 iptables 防火墙服务
启动防火墙后即可用iptables -L -n命令查看当前防火墙规则了。1
2
3
4
5
6
7
8
9
10
11
12
13$ systemctl start iptables
$ iptables -L -n
Chain INPUT (policy ACCEPT)
target prot opt source destination
ACCEPT all -- 0.0.0.0/0 0.0.0.0/0 state RELATED,ESTABLISHED
ACCEPT icmp -- 0.0.0.0/0 0.0.0.0/0
ACCEPT all -- 0.0.0.0/0 0.0.0.0/0
ACCEPT tcp -- 0.0.0.0/0 0.0.0.0/0 state NEW tcp dpt:22
REJECT all -- 0.0.0.0/0 0.0.0.0/0 reject-with icmp-host-prohibited
Chain FORWARD (policy ACCEPT)
target prot opt source destination
REJECT all -- 0.0.0.0/0 0.0.0.0/0 reject-with icmp-host-prohibitediptables 添加防火墙规则,有两种方法:
通过 iptables 命令行工具添加:
iptables -I INPUT ...;
这种方式添加的规则不需要重启 iptables 即可立即生效,但是配置在重启服务器后会丢失,想持久保存下来执行如下命令(该命令会自动把命令行配置的规则写入/etc/sysconfig/iptables,从而实现 iptables 规则的持久化保存):1
$ service iptables save
⚠️注意
service iptables save和iptables-save命令的区别:service iptables save作用是将iptables命令编辑的防火墙规则持久化保存下来,保存到/etc/sysconfig/iptables;iptables-save的作用是将内核中当前存在的防火墙规则导出来,和直接cat /etc/sysconfig/iptables的效果是一样的;
通过编辑
/etc/sysconfig/iptables文件添加防火墙规则;
通过这种方式添加的防火墙规则,需要重启 iptables 服务才能生效,并且服务器重启后配置的规则依然保留:1
$ systemctl restart iptables
举例:添加/删除 禁止 ping 响应的规则
1
2
3
4添加禁止 ICMP 回显响应规则:
iptables -A INPUT -i eth1 -p icmp -m icmp --icmp-type 8 -j DROP
删除上面规则:
iptables -D INPUT -i eth1 -p icmp -m icmp --icmp-type 8 -j DROP
查看防火墙状态
1
$ systemctl status iptables
相关资料
http://shaozhuqing.com/?p=4787 | iptables 和 firewalld 关系
https://blog.51cto.com/xjsunjie/1902993 | 细说firewalld和iptables
https://support.rackspace.com/how-to/use-iptables-with-centos-7/ | Use iptables with CentOS 7
https://o-my-chenjian.com/2017/02/28/Using-Iptables-On-Centos7/ | 在Centos7上使用Iptables
使用 Vagrant 调试 Ansible Playbook

简介
本文主要介绍使用 Vagrant 本地调试 Ansible Playbook 的最佳实践。
我平时用 ansible 做一些自动化任务,难免要写很多 playbook,如果直接将写的 playbook 在线上或者真实的服务器运行难免会担心出错,而且很可能会导致严重的错误。最好的方法就是先在本地虚拟机测试好,然后跑到真实的环境。我们可以将 Vagrant 和 ansible 结合使用来轻松地在本地调试 playbook。为什么使用这种方式呢?我觉得有如下好处(当然用了之后就知道有多爽了):
- 虚拟机用 Vagrant 管理,随时可以方便地删除、重建,这些操作都是简单的命令行;
- ansible 脚本在本地虚拟机可以随便折腾,哪怕 VM 折腾坏了,可以马上重建 VM;
- 所有操作都是基于配置文件,没有界面点触式操作,可以很好地将其工程化,放到 git 仓库统一管理;
Vagrant 结合 Ansible 的 workflow
Vagrant 结合 Ansible 的主要工作原理是使用 Vagrant 的 ansible_local 或者 ansible 配置器(Provisioner),这两个的唯一区别是前者会在 provision 时自动在 VM 安装 ansible,后者不会自动安装,需要自行安装。我选择用 ansible_local 配置器,懒得装一遍 ansible… 而且在 vagrant destroy 销毁虚拟机后重建时还能得到与之前一致的配置。
下面介绍下我本地调试 ansible playbook 脚本的 workflow。
使用 Vagrantfile 定义虚拟机
1
2
3
4
5
6
7
8
9
10
11
12
13
14
15
16
17
18Vagrant.configure("2") do |config|
config.vm.box = "Centos7"
config.vm.hostname= "ansible"
config.vm.network "private_network", ip: "192.168.10.100"
config.vm.provider :virtualbox do |vbox|
vbox.name = "ansible_vagrant"
vbox.memory = "512"
vbox.cpus = 1
end
# ansible 相关配置
config.vm.provision "ansible_local" do |ansible|
# ansible 运行时输出详细信息,作用同 ansible-playbook 的 -v 参数
# ansible.verbose = "v"
# 指定运行哪个 playbook
ansible.playbook = "playbook.yml"
end
end在 Vagrant 工程目录下编写 playbook,示例:
1
2
3
4
5
6
7
8
9
10
11
12
13
14
15
16
17
18
19---
- name: Test Playbook...
hosts: all
become: yes
gather_facts: no
vars:
- ip_list:
- 127.0.0.1
- 127.0.0.1
- 127.0.0.1
- 127.0.0.2
tasks:
- name: remove ip list file
file:
state: absent
path: /tmp/ip.txt
- name: test gen file
shell: echo "{{ item }}" >> /tmp/ip.txt
with_items: "{{ ip_list }}"playbook 写完后 执行
vagrant up启动虚拟机,启动过程中会自动执行 Vagrantfile 中配置的 playbook 文件(在 Vagrant 工程目录下);- 如果 playbook 运行有问题,则继续修改;
- 执行
vagrant rsync && vagrant provision重新运行 playbook;注意:在执行 vagrant provision 之前,一定要先 vagrant rsync 同步下本地主机和 VM 的共享目录,否则本地修改后不会生效。ansible 脚本的运行最终是在 VM 上面,读取的文件都是在 VM 的 /vagrant 目录。
- 如果测试 playbook 还是有问题则返回到第 4 步继续修改并测试;
- 如果一切都测试顺利的话,为了保险,最后模拟一下真实的环境:
vagrant destroy销毁 VM,然后vagrant up重新创建 VM 并自动运行 ansible playbook。
相关资料
https://linux.cn/article-9502-1.html | 使用 Vagrant 测试 Ansible 剧本
https://www.vagrantup.com/docs/provisioning/ansible_intro.html | Vagrant 和 Ansible
https://www.vagrantup.com/docs/provisioning/ansible_local.html | Vagrant ansible_local 配置器
https://www.vagrantup.com/docs/provisioning/ansible_common.html | Vagrant ansible 和 ansible_local 配置器通用配置